Setting up Amazon FSx for NetApp ONTAP for Red Hat OpenShift Service on AWS (ROSA) with Hosted Control Plane
Red Hat® OpenShift® Service on AWS (ROSA) integrates seamlessly with Amazon FSx for NetApp ONTAP (FSxN), a fully managed, scalable shared storage service built on NetApp's renowned ONTAP file system.
The integration with the NetApp Trident driver—a dynamic Container Storage Interface (CSI)—facilitates the management of Kubernetes Persistent Volume Claims (PVCs) on storage disks. This driver automates the on-demand provisioning of storage volumes across diverse deployment environments, making it simpler to scale and protect data for your applications.
What will you learn?
- How to integrate FSxN with ROSA
What do you need before starting?
Provisioning FSx for NetApp ONTAP
To begin, you must create a multi-availability zone (AZ) FSx for NetApp ONTAP in the same virtual private cloud (VPC) as the ROSA cluster. There are several ways to do this but for the purposes of this learning path we will be using a CloudFormation Stack.
Clone the GitHub repository
# git clone https://github.com/aws-samples/rosa-fsx-netapp-ontap.gitRun the CloudFormation Stack
Run the command below by replacing the parameter values with your own values:
# cd rosa-fsx-netapp-ontap/fsx
                        aws cloudformation create-stack \
                          --stack-name ROSA-FSXONTAP \
                          --template-body file://./FSxONTAP.yaml \
                          --region <region-name> \
                          --parameters \
                          ParameterKey=Subnet1ID,ParameterValue=[subnet1_ID] \
                          ParameterKey=Subnet2ID,ParameterValue=[subnet2_ID] \
                          ParameterKey=myVpc,ParameterValue=[VPC_ID] \
                        ParameterKey=FSxONTAPRouteTable,ParameterValue=[routetable1_ID,routetable2_ID] \
                          ParameterKey=FileSystemName,ParameterValue=ROSA-myFSxONTAP \
                          ParameterKey=ThroughputCapacity,ParameterValue=1024 \
                          ParameterKey=FSxAllowedCIDR,ParameterValue=[your_allowed_CIDR] \
                          ParameterKey=FsxAdminPassword,ParameterValue=[Define Admin password] \
                          ParameterKey=SvmAdminPassword,ParameterValue=[Define SVM password] \
                          --capabilities CAPABILITY_NAMED_IAM
Where:
region-name: same as the region where the ROSA cluster is deployed
subnet1_ID: id of the Preferred subnet for FSxN \
subnet2_ID: id of the Standby subnet for FSxN
VPC_ID: id of the VPC where the ROSA cluster is deployed
routetable1_ID, routetable2_ID: ids of the route tables associated with the subnets chosen above
your_allowed_CIDR: allowed CIDR range for the FSx for ONTAP security groups ingress rules to control access. You can use 0.0.0.0/0 or any appropriate CIDR to allow all traffic to access the specific ports of FSx for ONTAP.
Define Admin password: A password to login to FSxN Define SVM password: A password to login to SVM that will be created
Verify that your file system and storage virtual machine (SVM) has been created using the Amazon FSx console, shown below:
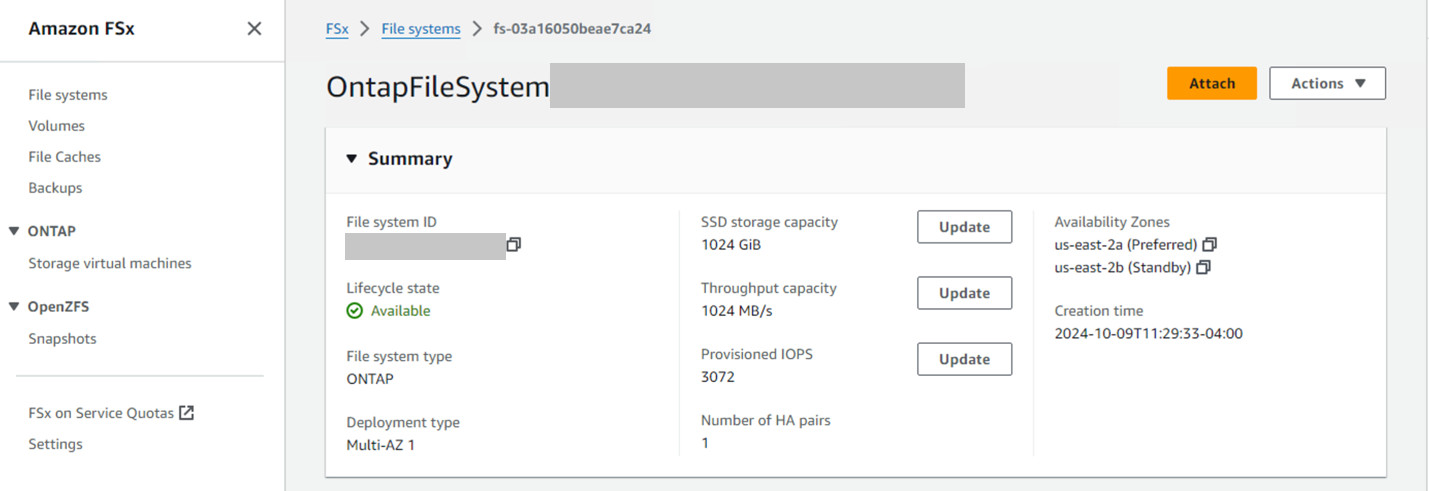
The Amazon console page displaying the newly created OntapFileSystem and its availability.
Installing and configuring Trident CSI driver for the ROSA cluster
Add the NetApp Trident Helm repository.
# helm repo add netapp-trident https://netapp.github.io/trident-helm-chart- Install trident using helm
- Note that depending on the version you install, the version parameter will need to be changed in the following command (refer to the documentation for the correct version number):
# helm install trident netapp-trident/trident-operator --version 100.2406.0 --create-namespace --namespace trident- For the correct installation method for the specific Trident version you want to install, refer to the Trident documentation.
- Verify that all Trident pods are in the running state.
#oc get pods -n tridentNAME READY STATUS RESTARTS AGE trident-controller-f5f6796f-vd2sk 6/6 Running 0 19h trident-node-linux-4svgz 2/2 Running 0 19h trident-node-linux-dj9j4 2/2 Running 0 19h trident-node-linux-jlshh 2/2 Running 0 19h
Configure the Trident CSI backend to use FSx for NetApp ONTAP (ONTAP NAS)
The Trident back-end configuration tells Trident how to communicate with the storage system (in this case, FSxN). For creating the backend, we will provide the credentials of the SVM to connect to, along with the Cluster Management and the NFS data interfaces. We will use the ontap-nas driver to provision storage volumes in the FSx file system.
- Create a secret for the SVM credentials using the following yaml.
apiVersion: v1
                                                kind: Secret
                                                metadata:
                                                  name: backend-fsx-ontap-nas-secret
                                                  namespace: trident
                                                type: Opaque
                                                stringData:
                                                  username: vsadmin
                                                  password: <value provided for Define SVM password as a parameter to the Cloud Formation Stack>
Note: You can also retrieve the SVM password created for FSxN from the AWS Secrets Manager as shown below.

AWS Secrets Manager menu displaying current secrets available. 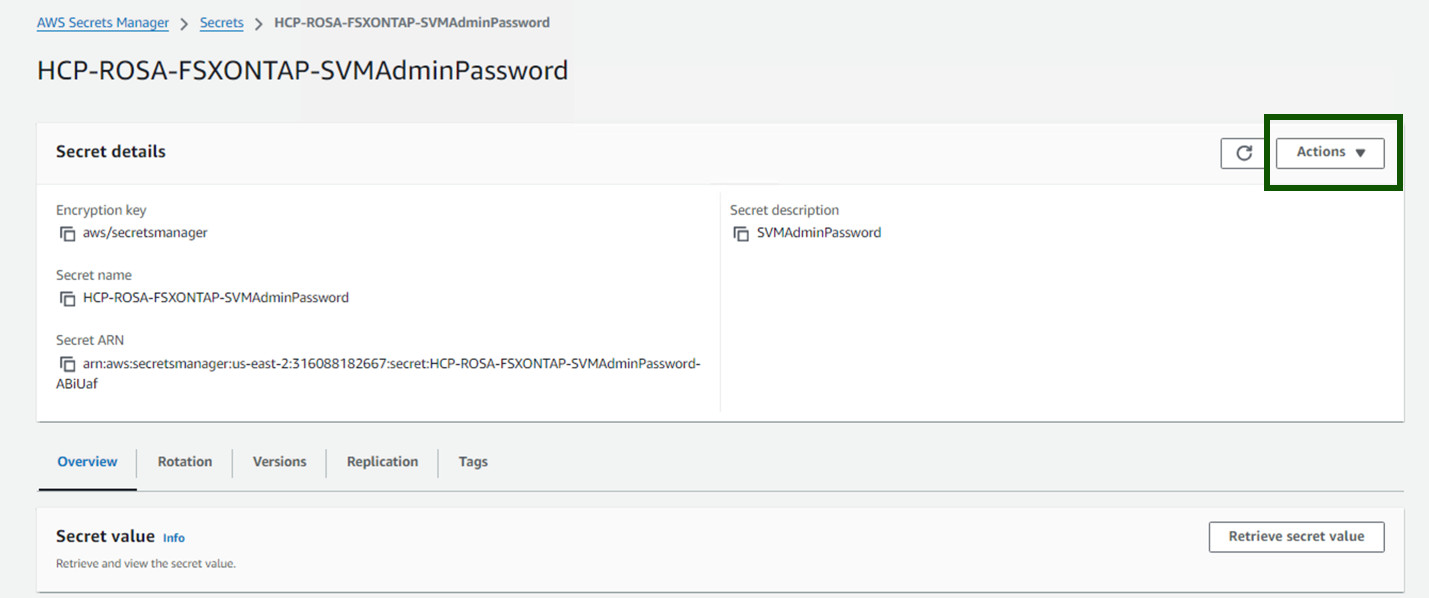
AWS secrets manager page with Actions dropdown menu highlighted.
- Add the secret for the SVM credentials to the ROSA cluster using the following command:
# oc apply -f svm_secret.yaml- You can verify that the secret has been added in the trident namespace using the following command:
# oc get secrets -n trident |grep backend-fsx-ontap-nas-secret
- Create the backend object.
- For this, move into the fsx directory of your cloned Git repository. Open the file backend-ontap-nas.yaml. Replace the following:
- managementLIF with the Management DNS name
- dataLIF with the NFS DNS name of the Amazon FSx SVM and
- svm with the SVM name. Create the backend object using the following command.
# oc apply -f backend-ontap-nas.yamlNote: You can get the Management DNS name, NFS DNS name and the SVM name from the Amazon FSxN Console as shown in the screenshot below:
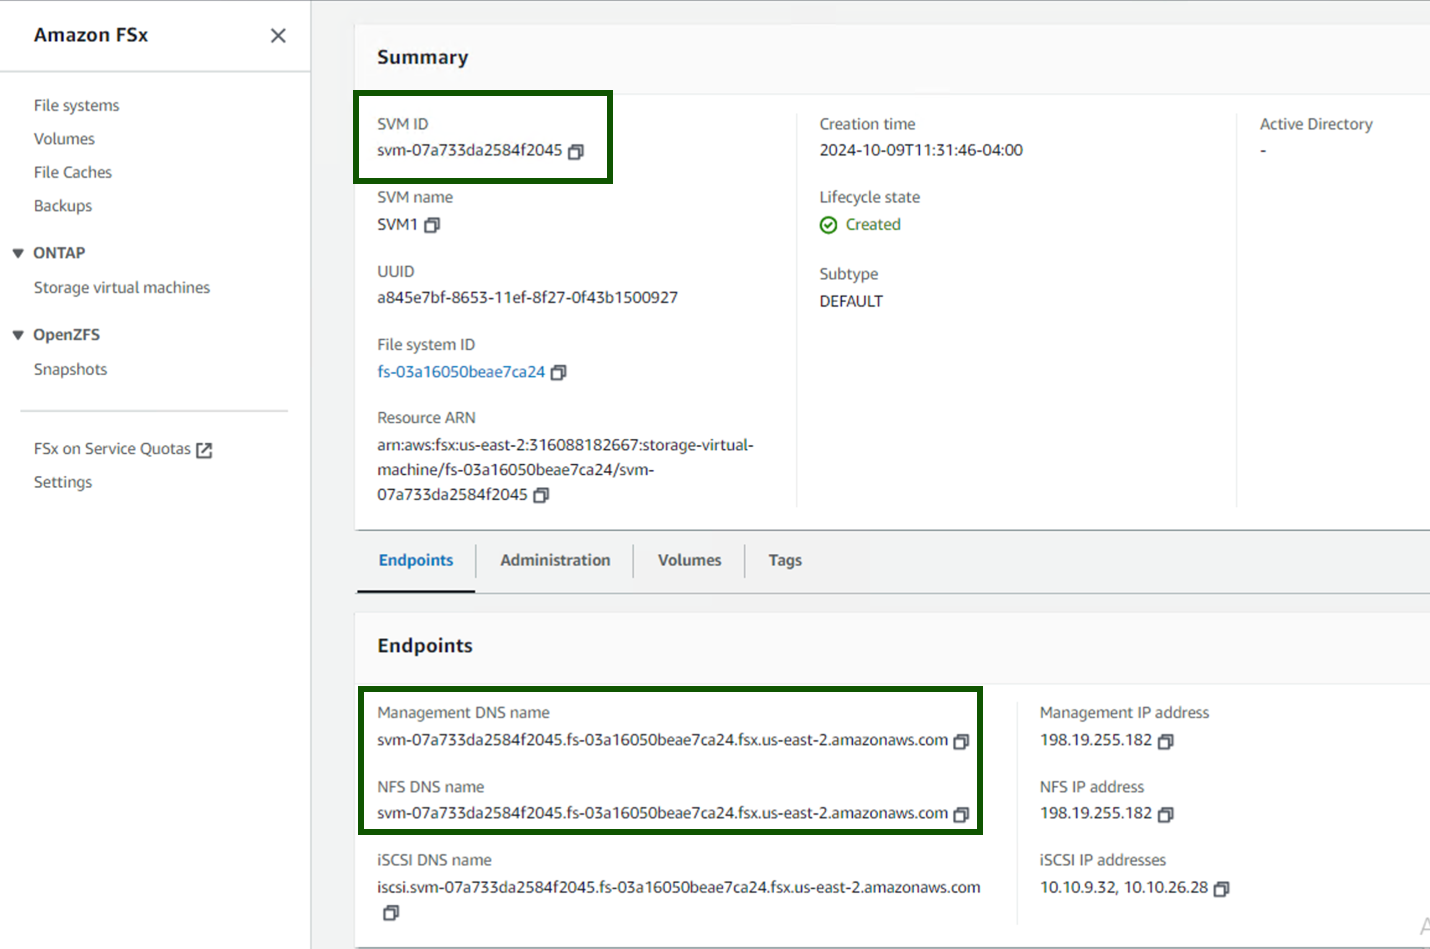
The summary screen on Amazon FSx console displaying the SVM ID, NFS DNS name and SVM name highlighted.
Run the following command to verify that the backend object has been created and Phase is showing Bound and Status is Success.

Returned command line results showing the backend-fsx-ontap-nas object as Bound and Success.
Create Storage Class
Now that the Trident backend is configured, you can create a Kubernetes storage class to use the backend. Storage class is a resource object made available to the cluster. It describes and classifies the type of storage that you can request for an application.
- Review the file storage-class-csi-nas.yaml in the fsx folder.
apiVersion: storage.k8s.io/v1
                                kind: StorageClass
                                metadata:
                                  name: trident-csi
                                provisioner: csi.trident.netapp.io
                                parameters:
                                  backendType: "ontap-nas"
                                  fsType: "ext4"
                                allowVolumeExpansion: True
                                reclaimPolicy: Retain
- Create Storage Class in ROSA cluster and verify that trident-csi storage class has been created.
# oc apply -f storage-class-csi-nas.yaml
Command line results showing names, provisioners, reclaim policy, volume binding mode, allow volume expansion, and age of created storage classes. This completes the installation of Trident CSI driver and its connectivity to FSx for ONTAP file system. Now you can deploy a sample Postgresql stateful application on ROSA using file volumes on FSx for ONTAP.
Verify that there are no PVCs and PVs created using the trident-csi storage class.
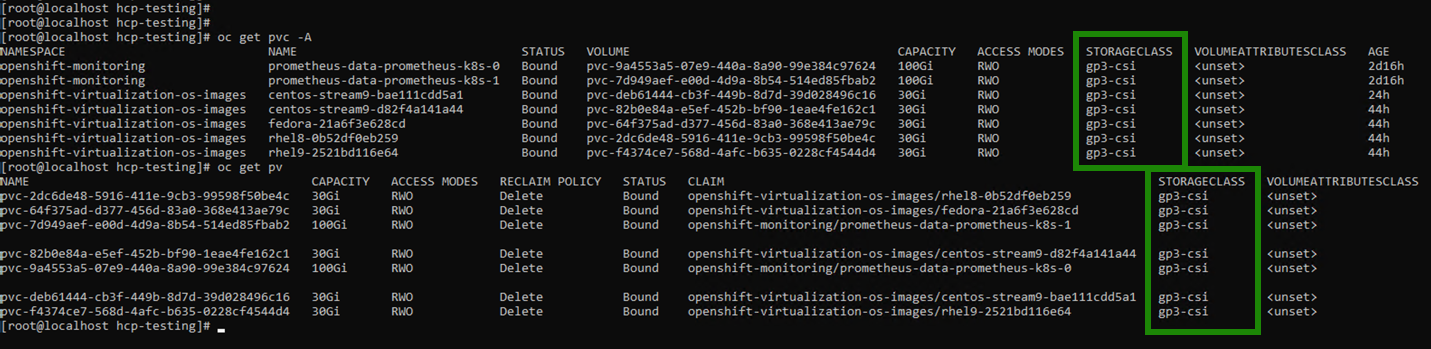
Command line results from "oc get pvc -4" command showing existing storage classes over multiple namespaces. - Verify that applications can create PV using Trident CSI.
- Create a PVC using the pvc-trident.yaml file provided in the fsx folder.
pvc-trident.yaml kind: PersistentVolumeClaim apiVersion: v1 metadata: name: basic spec: accessModes: - ReadWriteMany resources: requests: storage: 10Gi storageClassName: trident-csi- You can issue the following commands to create a pvc and verify that it has been created:
# oc create -f pvc-trident.yaml -n trident
                # oc get pvc -n trident
Command line results from "oc get pvc -n trident" command showing created pvcs.
Deploy a sample Postgresql stateful application
- Use helm to install postgresql
# helm install postgresql bitnami/postgresql -n postgresql --create-namespace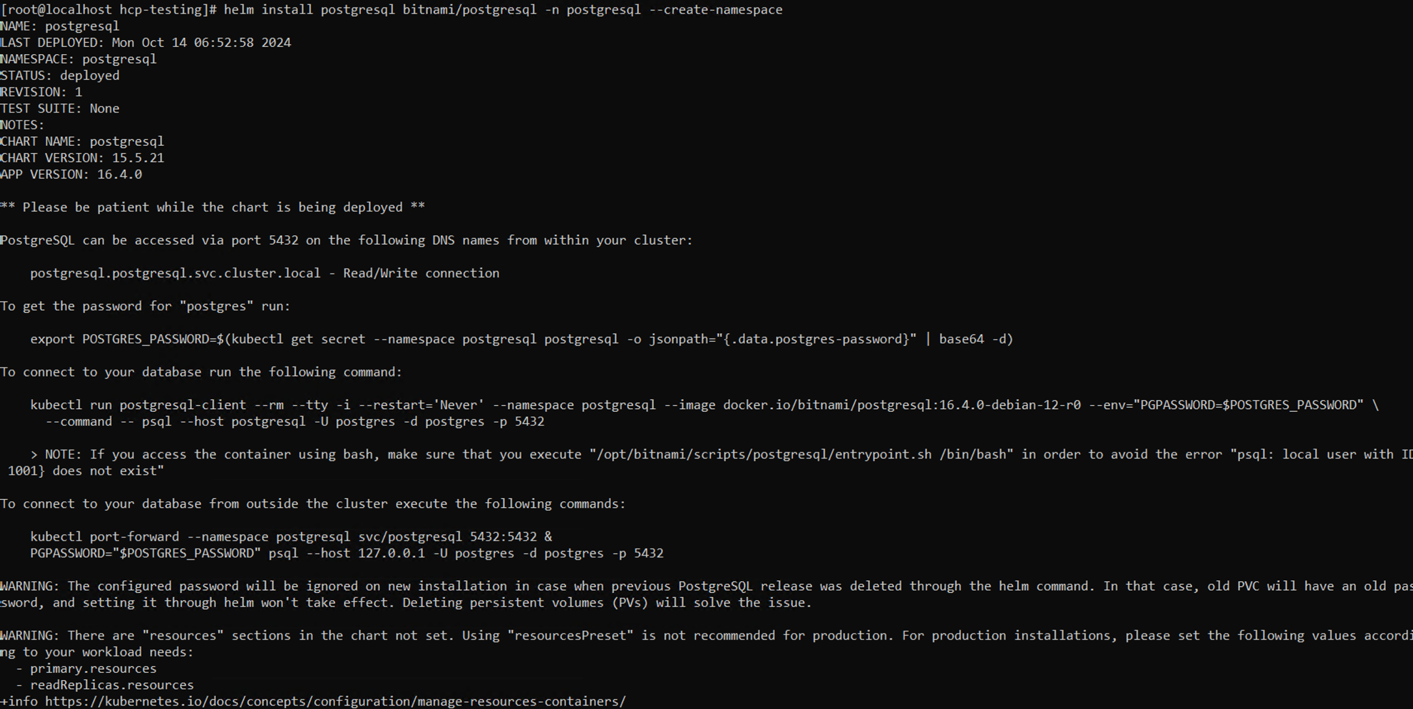
Command line readout from helm installation.
- Verify that the application pod is running, and a PVC and PV is created for the application.
# oc get pods -n postgresql
Command line result showing pods running. 
Command line result showing pvc readout. 
Command line result showing the created PV.
- Use the following command to get the password for the postgresql server that was installed.
# export POSTGRES_PASSWORD=$(kubectl get secret --namespace postgresql postgresql -o jsoata.postgres-password}" | base64 -d)
- Use the following command to run a postgresql client and connect to the server using the password.
# kubectl run postgresql-client --rm --tty -i --restart='Never' --namespace postgresql --image docker.io/bitnami/postgresql:16.2.0-debian-11-r1 --env="PGPASSWORD=$POSTGRES_PASSWORD" \
                                > --command -- psql --host postgresql -U postgres -d postgres -p 5432
Comman line readout after using command to run postgresql client.
Create a database and a table. Create a schema for the table and insert 2 rows of data into the table.
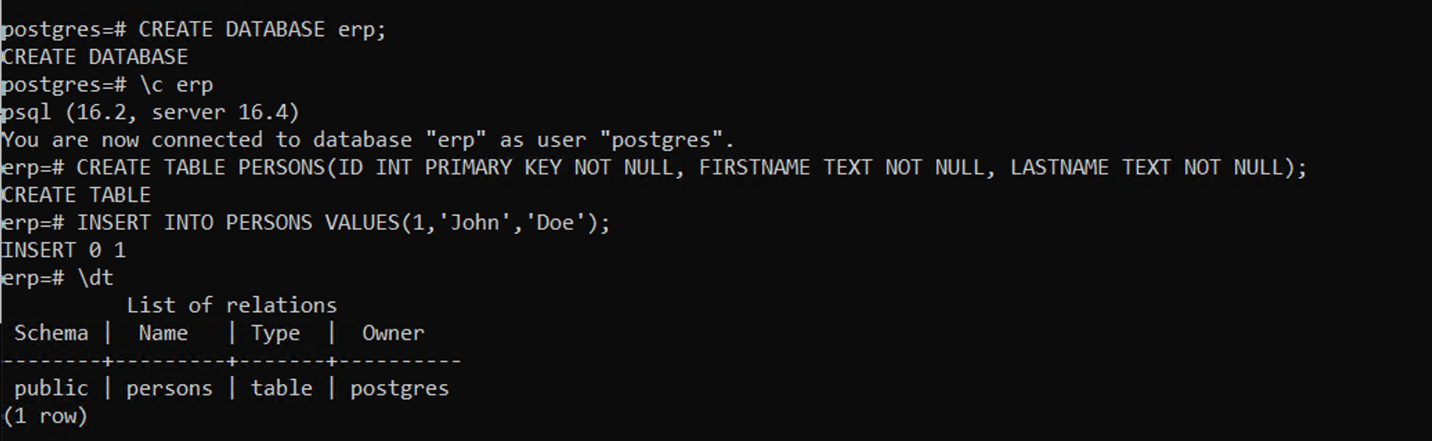
Example create database and table commands. 
Table example showing a single row with id of 1 belonging to John Doe. 
Example created database with two rows. One for John Doe (id=1) and Jane Scott (id=2) - Create a Snapshot of the app volume
- Create a VolumeSnapshotClass
Save the following manifest in a file called volume-snapshot-class.yaml apiVersion: snapshot.storage.k8s.io/v1 kind: VolumeSnapshotClass metadata: name: fsx-snapclass driver: csi.trident.netapp.io deletionPolicy: Delete- Create a snapshot by using the above manifest.

Command line readout from executing snapshot command.
- Create a VolumeSnapshotClass
- Create a snapshot.
- Create a snapshot of the existing PVC by creating VolumeSnapshot to take a point-in-time copy of your Postgresql data. This creates an FSx snapshot that takes almost no space in the filesystem backend. Save the following manifest in a file called volume-snapshot.yaml:
apiVersion: snapshot.storage.k8s.io/v1
                                kind: VolumeSnapshot
                                metadata:
                                 name: postgresql-volume-snap-01
                                spec:
                                 volumeSnapshotClassName: fsx-snapclass
                                 source:
                                   persistentVolumeClaimName: data-postgresql-0
- Create the volume snapshot and confirm that it is created:
#oc create -f postgresql-volume-snapchat.yaml -n postgresql#oc get VolumeSnapShot -n postgresql
Command line readout retrieving the volume snapshot
Delete the database to simulate the loss of data (data loss can happen due to a variety of reasons, here we are just simulating it by deleting the database).

Previously created database being shown. 
Showing the database being dropped via command line.
Restore from Snapshot
To restore the volume to its previous state, you must create a new PVC based on the data in the snapshot you took.
- Create a volume clone from the snapshot. Save the following manifest in a file named pvc-clone.yaml.
apiVersion: v1 kind: PersistentVolumeClaim metadata: name: postgresql-volume-clone spec: accessModes: - ReadWriteOnce storageClassName: trident-csi resources: requests: storage: 8Gi dataSource: name: postgresql-volume-snap-01 kind: VolumeSnapshot apiGroup: snapshot.storage.k8s.io- Create a clone of the volume by creating a PVC using the snapshot as the source using the above manifest.
- Apply the manifest and ensure that the clone is created.
# oc create -f postgresql-pvc-clone.yaml -n postgresql
Command line readout after applying the manifest
- Delete the original postgresql installation.
# helm uninstall postgresql -n postgresql
Command line readout for deletion of helm.
- Create a new postgresql application using the new clone PVC.
# helm install postgresql bitnami/postgresql --set primary.persistence.enabled=true --set primary.persistence.existingClaim=postgresql-volume-clone -n postgresql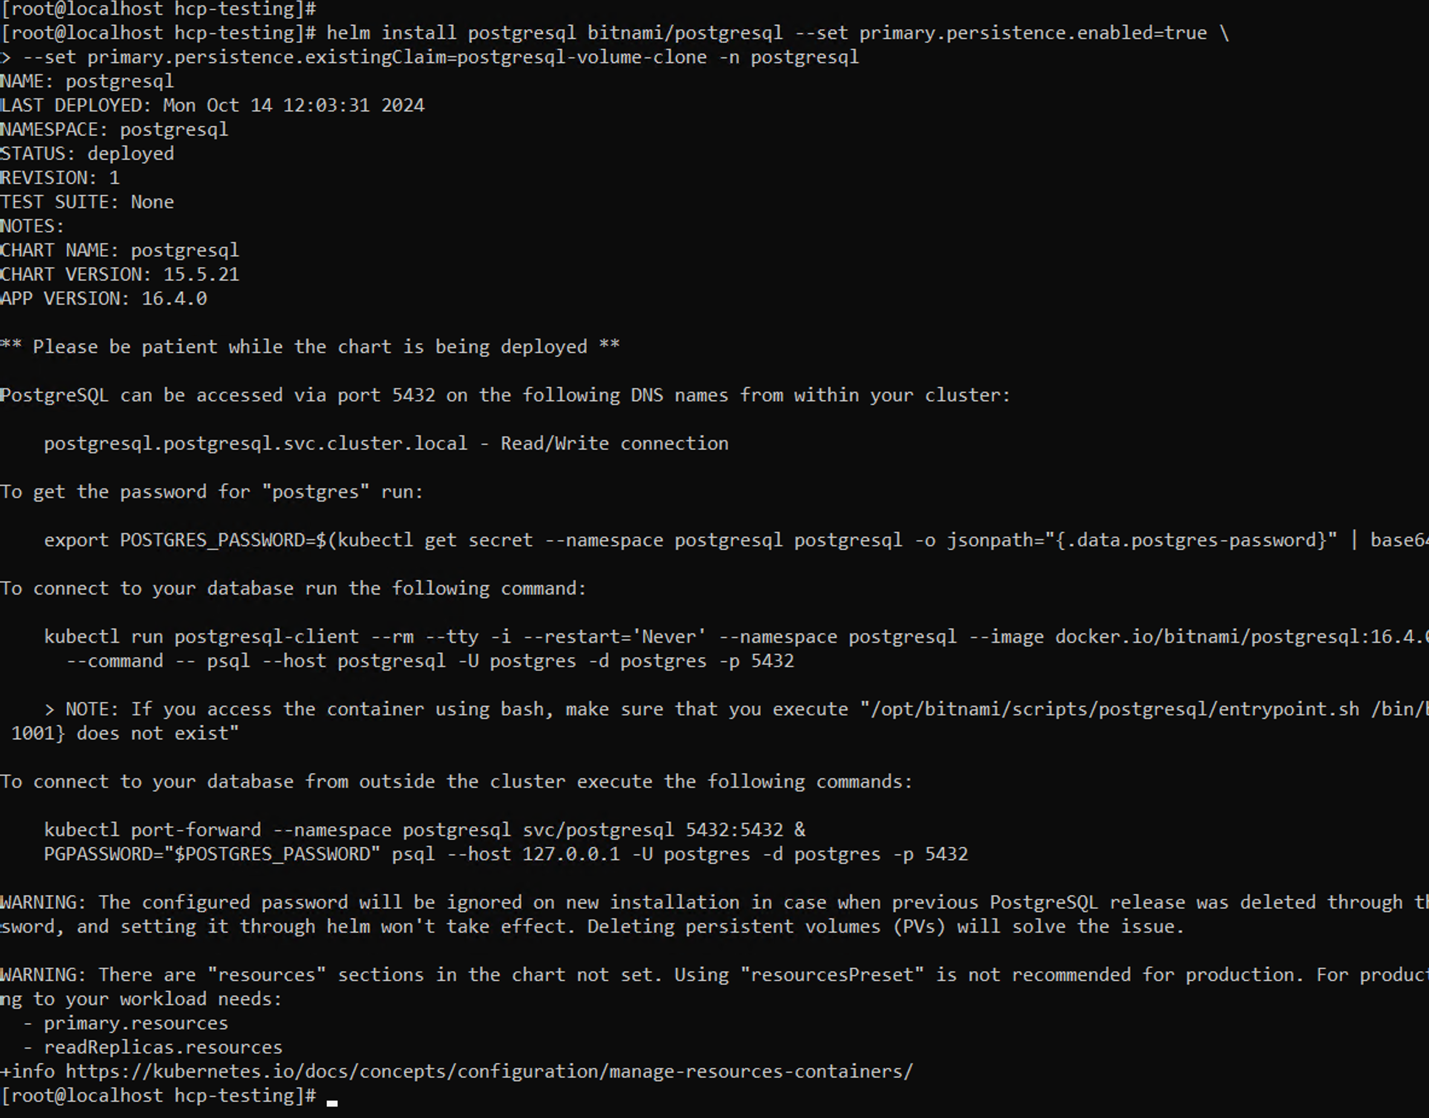
Command line showing the post helm install.
Verify that the application pod is in the running state.

Command line showing running status for postgresql-0 - Verify that the pod uses the clone as its PVC.
# oc describe pod/postgresql-0 -n postgresql
Command line showing input of describe pod command. 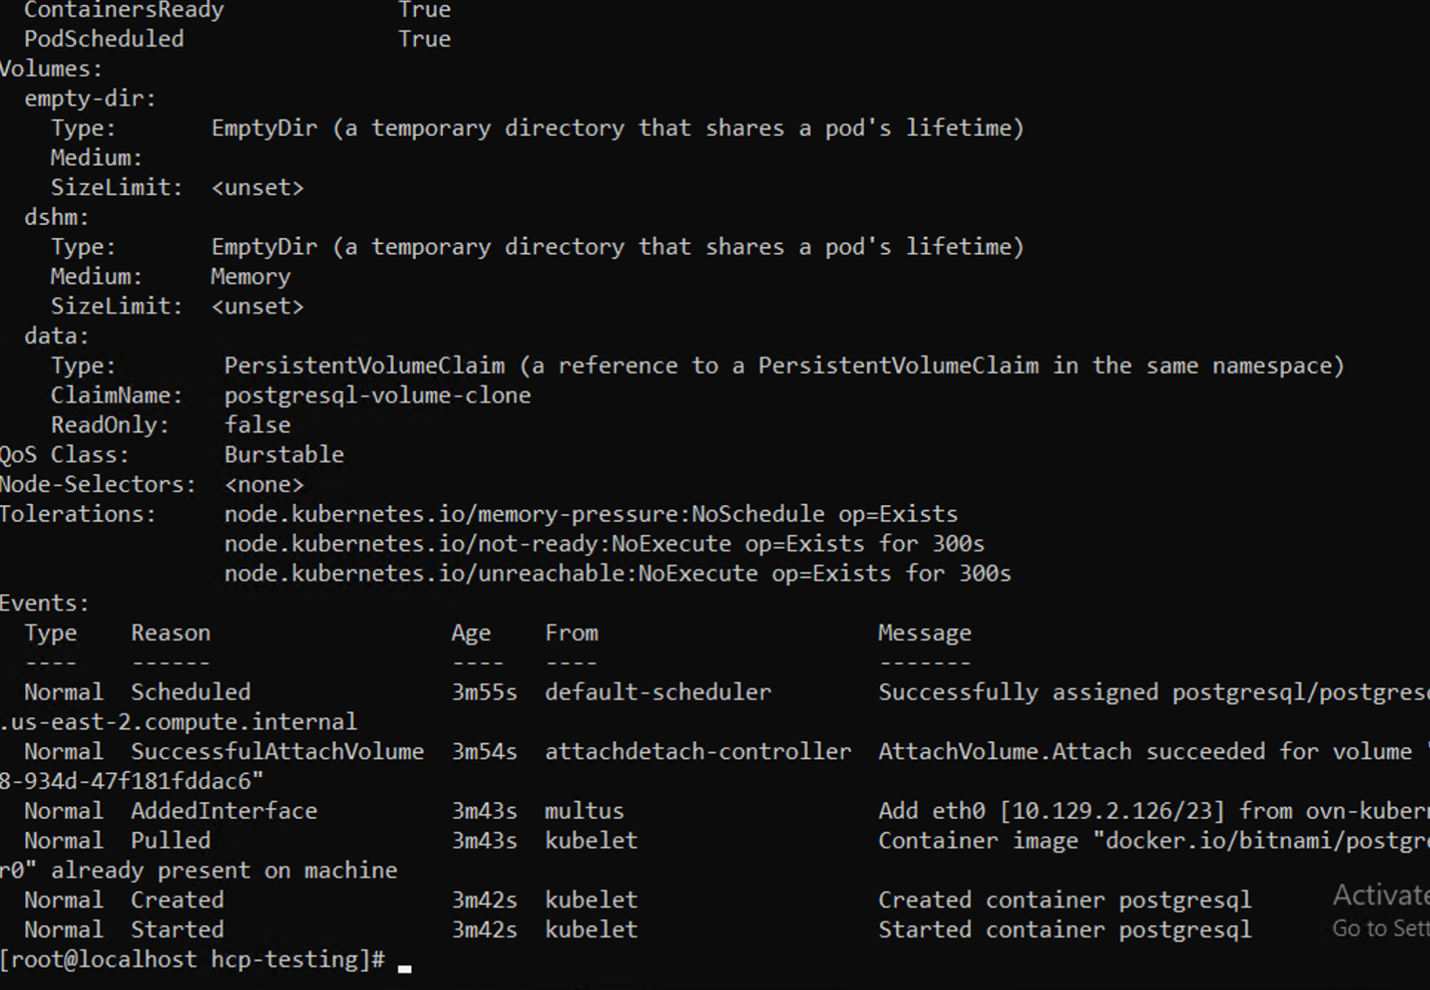
Command line readout of ready containers
To validate that the database has been restored as expected, go back to the container console and show the existing databases.
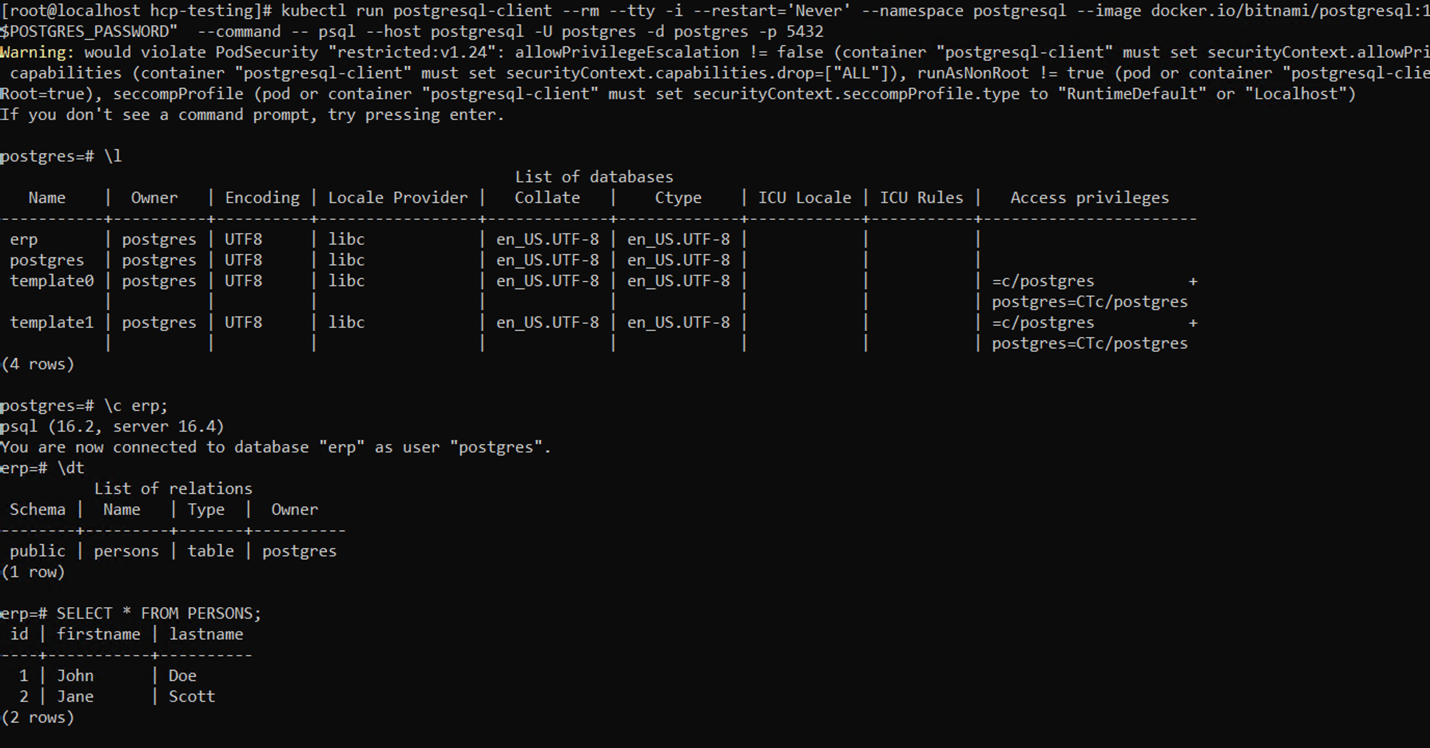
Container console showing restored database.
Congrats! You have successfully primed your environment with FSxN and deployed a containerized database to it. Now that you have a ROSA HCP cluster with FSxN attached, you can now look into the live migration of the virtual machines with OpenShift Virtualization on the ROSA cluster.
