Upgrading a Red Hat OpenShift Service on AWS cluster using CLI or console
All upgrades are fully executed by Red Hat® OpenShift® Service on AWS (ROSA) for your cluster, meaning that you won't need to execute any commands or make changes to the cluster. You do have choices for scheduling them.
There are 3 ways to upgrade your cluster.
- Manually via the command line interface (CLI) - Start a one-time immediate upgrade or schedule a one-time upgrade for a future date/time.
- Manually via the OpenShift Cluster Manager (OCM) user interface (UI) - Start a one-time immediate upgrade or schedule a one-time upgrade for a future date/time.
- Automated upgrades - Set an upgrade window for recurring y-stream upgrades whenever a new version is available without needing to manually schedule it (Ex: Saturday at 06:00 UTC). Minor versions have to be manually scheduled.
We will go through each of these three scenarios.
You can always use --help for more details like:
rosa upgrade cluster --help
What will you learn?
- How to schedule a one-time immediate or future upgrade using the CLI
- How to schedule a one-time immediate or future upgrade using the OCM UI
- How to set an automated y-stream upgrade window for major versions
What do you need before starting?
Upgrade manually via the CLI
- Check if there is an upgrade available by running the following command:
Inline -
rosa list upgrade -c <cluster-name>You will get a list that shows the available version and the current version of your cluster. For example:
$ rosa list upgrade -c <cluster-name>

	VERSION  NOTES

	4.10.20   recommended

	4.10.18

	...
In our example we see that version 4.10.18 is available and so is 4.10.20.
- Upgrade the cluster to the latest version by running:
rosa upgrade cluster -c my-rosa-cluster --version 4.10.20 - This will schedule the cluster for upgrade within the hour. It will take some time to complete.
- You can also schedule the upgrade for a later date/time by using the <
--schedule-dateand--schedule-timeflags.
Upgrade manually via OCM UI
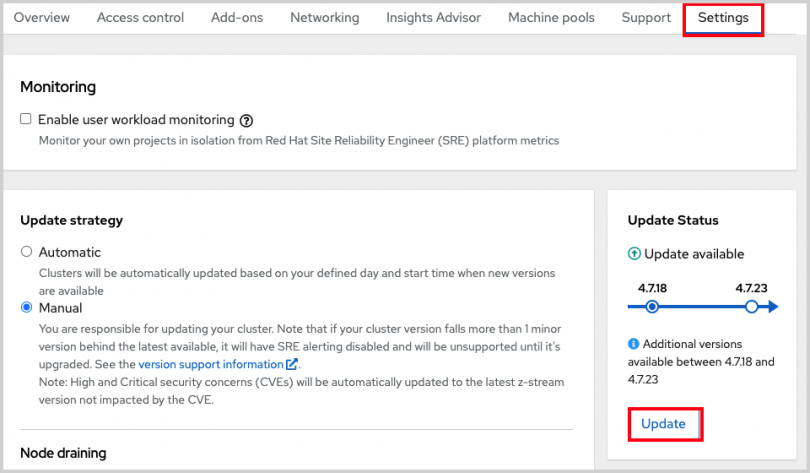
- To perform an upgrade via the UI, log into OCM and select the cluster you want to upgrade.
- Click on the “Settings” tab.
- You will see if an upgrade is available and if so, click on the “Update” button.

- This will open a window allowing you to select the version to upgrade to.
- You can then schedule a time for the upgrade or begin it immediately.
Set up automatic updates
- To set up your cluster for recurring upgrades, log into OCM and select the cluster you want to upgrade.
- Click on the “Update Settings” tab.
- Under “Update Strategy” click the “Automatic” radio button.
- This will open up options for a day of the week and time that you can set for the update to occur.
- Select a “Grace period” for allowing the nodes to gracefully drain before forcing the pod eviction under “Node draining”.
- Click Save.
You have officially set up, deployed, and customized your first cluster. In the next resource, we’ll show you how to delete a cluster if the need arises.
