Using iSCSI storage for container apps on ROSA
On Red Hat® OpenShift® Service on AWS (ROSA), Trident (NetApp's storage orchestrator for Kubernetes) integrates with Internet Small Computers System Interface (iSCSI). This integration automates the process of provisioning iSCSI volumes for containers and makes it easier for developers to request and use persistent storage.
What will you learn?
- How to deploy a Postgresql application using iSCSI storage class
What you need before starting:
- Red Hat account
- Access to Red Hat OpenShift on the Red Hat Hybrid Cloud Console
- Amazon Web Services account
- IAM user credential with appropriate permissions to create and access ROSA cluster
- AWS command line-interface
- ROSA command line-interface
- OpenShift command-line interface (oc)
- Helm 3 documentation
- A HCP ROSA cluster
Deploy a PostgreSQL application using iSCSI storage class
Use the following yaml to deploy the postgreSQL app.
Inspect the setup file using the command
#cat postgres-san.yamla. Review the PostgreSQL database application:
apiVersion: apps/v1
kind: Deployment
metadata:
  name: postgres
spec:
  replicas: 1
  selector:
    matchLabels:
      app: postgres
  template:
    metadata:
      labels:
        app: postgres
    spec:
      containers:
      - name: postgres
        image: postgres:14
        env:
        - name: POSTGRES_USER
          #value: "myuser"
          value: "admin"
        - name: POSTGRES_PASSWORD
          #value: "mypassword"
          value: "adminpass"
        - name: POSTGRES_DB
          value: "mydb"
        - name: PGDATA
          value: "/var/lib/postgresql/data/pgdata"
        ports:
        - containerPort: 5432
        volumeMounts:
        - name: postgres-storage
          mountPath: /var/lib/postgresql/data
      volumes:
      - name: postgres-storage
        persistentVolumeClaim:
          claimName: postgres-pvc
b. Request dedicated digital storage “sc-fsx-san”
 ---
apiVersion: v1
kind: PersistentVolumeClaim
metadata:
  name: postgres-pvc
spec:
  accessModes:
    - ReadWriteOnce
  resources:
    requests:
      storage: 5Gi
  storageClassName: sc-fsx-san
c. Create a stable network address to connect to your database
---
apiVersion: v1
kind: Service
metadata:
  name: postgres
spec:
  selector:
    app: postgres
  ports:
  - protocol: TCP
    port: 5432
    targetPort: 5432
  type: ClusterIP
d. Create a dedicated space and run the setup commands
#oc create namespace postgres-san
root@localhost HAFSX]# oc create -f postgres-san.yaml -n postgres-san
deployment.apps/postgres created
persistentvolumeclaim/postgres-pvc created
service/postgres created
Verify that the application pod is running and that a PVC and PV are created for the application.

a. Note: the storage class for the PVC uses the san storage class previously created using iSCSI.
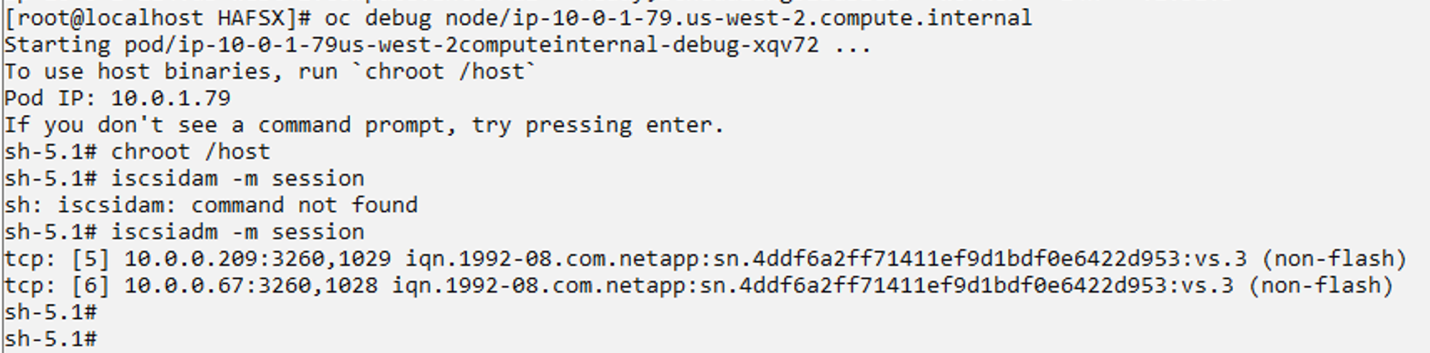
- Verify that iSCSi sessions are created in the node where the pod runs.

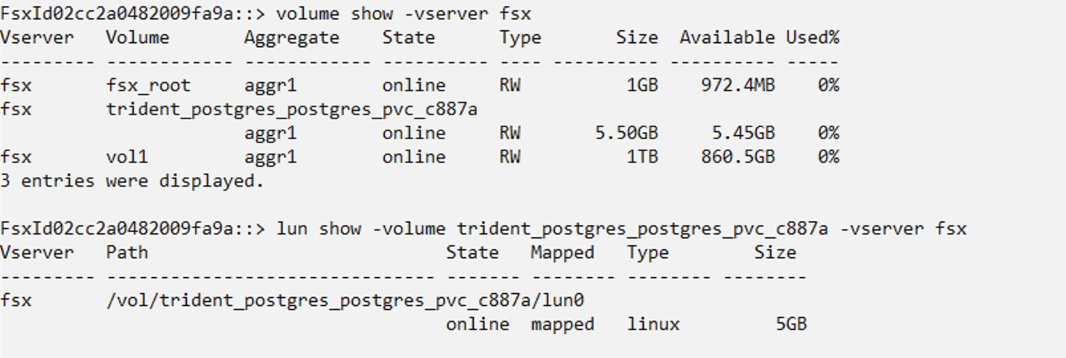
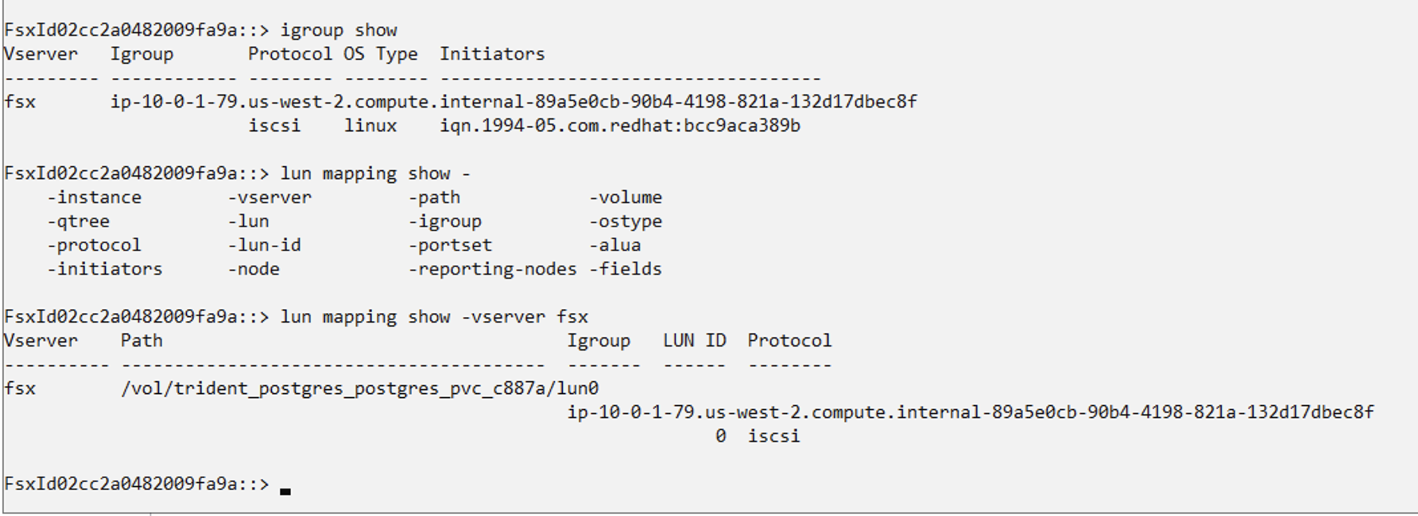
- Verify that a lun is created on the volume in FSxN for this application and the lun is mapped. You can log into the FSxN CLI using fsxadmin and the password you previously created.
You have now successfully deployed a Postgresql application using iSCSI storage class!
