
Migrating vSphere VMs to ROSA HCP with Migration Toolkit for Virtualization while preserving the VM IP address
This content is authored by Red Hat experts, but has not yet been tested on every supported configuration. This guide has been validated on OpenShift 4.22. Operator CRD names, API versions, and console paths may differ on other versions.
Many VM dependencies refer to an IP address rather than a VM name. Firewall rules, DNS records, load balancer members, licence servers, and monitoring targets can all require changes when a migrated VM is renumbered.
This guide describes how we migrated a Fedora VM from vSphere to Red Hat OpenShift Service on AWS (ROSA) with hosted control planes by using the Migration Toolkit for Virtualization (MTV). The destination VM used its original IP address, 10.100.0.50, and an EC2 instance reached that address directly over BGP without inbound NAT.
We also tested declarative IP and MAC assignment on a separate RHEL 9 VM. Both addresses survived stop/start and live migration between worker nodes. We have not yet tested the combined workflow on a VMware-derived VM, from disk conversion through automatic IPAMClaim management and live migration with the requested identity.
This guide builds on Deploying BGP Cloud Connector on ROSA HCP , which covers the official Red Hat Operator, AWS Route Server, FRR, the primary CUDN, and direct EC2-to-VM routing. The sections below focus on migration and identity retention.
How IP preservation works
IP retention and reachability rely on the following components:
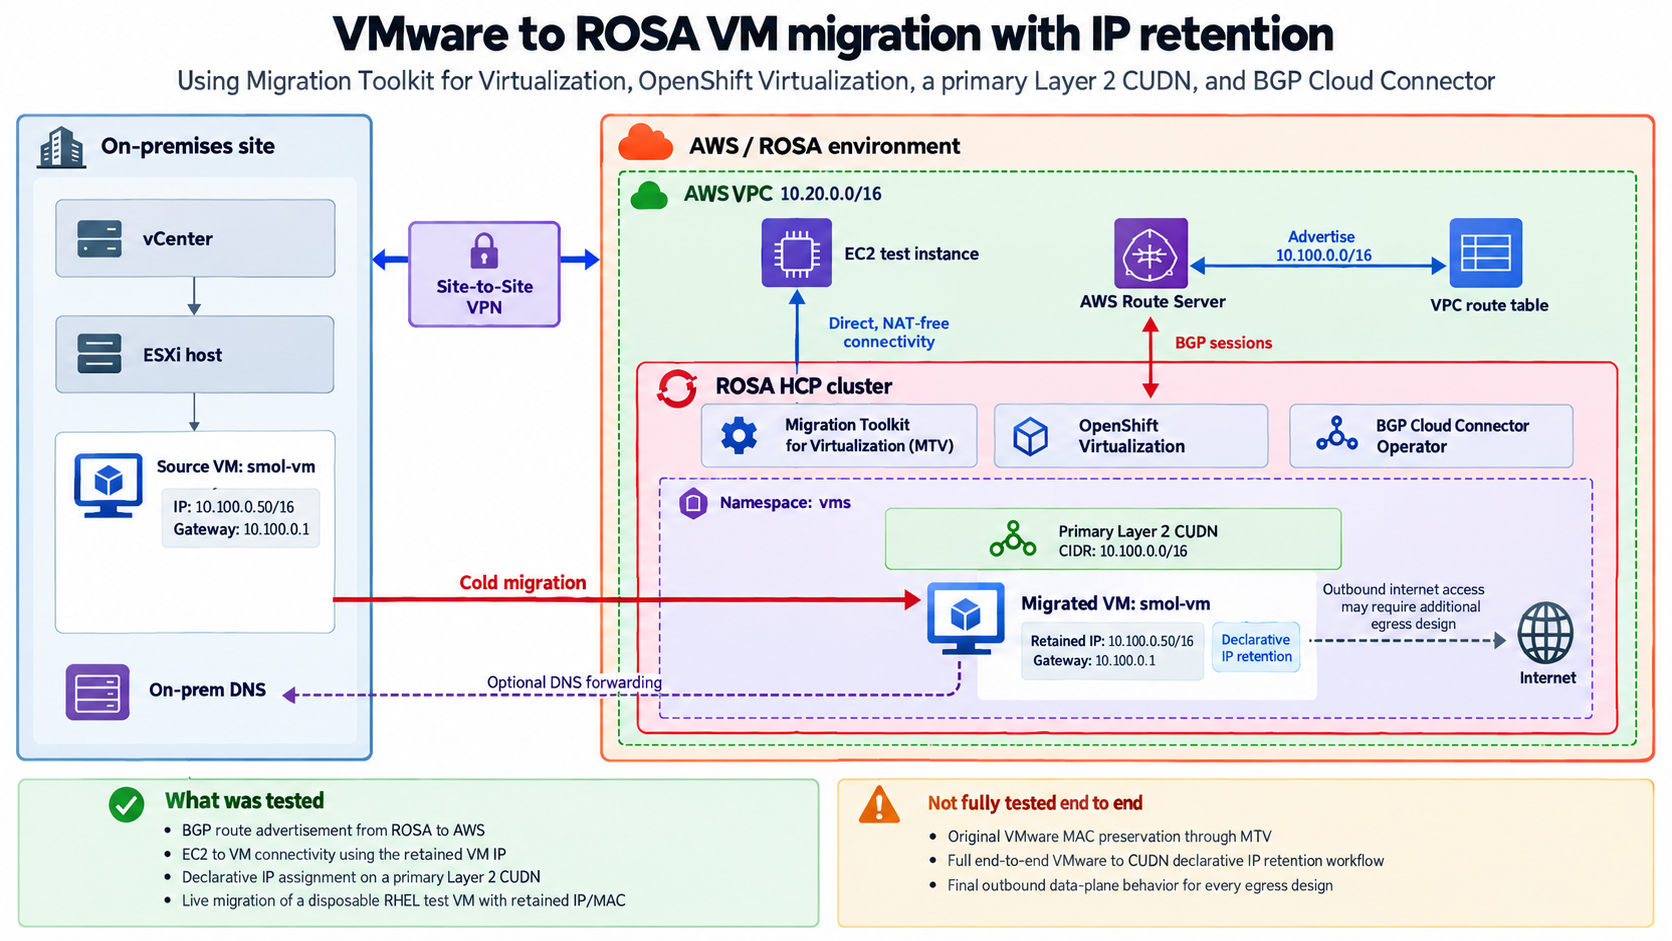
- BGP Cloud Connector Operator
- Advertises the VM network into the AWS VPC route tables.
- This is what makes the VM address reachable from outside the cluster, such as from an EC2 instance.
- Primary Layer 2 CUDN with persistent IPAM
- Provides the VM subnet inside the cluster.
- Keeps IP allocations stable across VM restarts, and with the right storage, across live migration.
- In this workflow, you do not create the CUDN directly. The
BGPRoutingresource generates it.
- Declarative address request
- The
network.kubevirt.io/addressesannotation asks for a specific VM IP. - OVN-Kubernetes then creates and manages the backing
IPAMClaimautomatically.
- The
l2bridgebinding- Lets the guest use the real CUDN address instead of a NATed pod address.
- This is also the binding used in our live migration tests.
- Inside the cluster, the VM lives on a Layer 2 network. That is what lets the VM keep the same subnet identity while moving between nodes.
- Outside the cluster, AWS reaches that subnet through Layer 3 routing. BGP advertises the route, and AWS sends traffic toward the selected node next hop.
The companion BGP deployment test used native KubeVirt bridge: {} for direct EC2-to-VM routing. This guide uses the l2bridge binding plugin, which supports live migration when the VM also uses suitable shared storage.
Prerequisites
- A ROSA cluster with hosted control planes, version 4.22 or later
- The official BGP Cloud Connector Operator deployed as described in the
companion guide
, with
BGPCloudConfigurationandBGPRoutingreportingReady, established BGP sessions, and the CUDN prefix present in the required AWS route tables - The OpenShift Virtualization operator installed, with a healthy
HyperConvergedresource. See Deploying OpenShift Virtualization on ROSA if you have not done this yet - At least two bare metal worker nodes that match
bgp_router=true. The companion guide assigns that label through the ROSA machine pool so BGP Cloud Connector selects every node that can host a directly routed VM. Live migration requires a second eligible node, and only bare metal instance types exposedevices.kubevirt.io/kvm - Network connectivity from the cluster to your vSphere environment, for example an AWS Site to Site VPN or Direct Connect
oc,virtctl, and theawsCLI available locally- Cluster administrator access
Check which of your nodes can actually run VMs before you start. Only nodes reporting a devices.kubevirt.io/kvm value are eligible:
If virtualization uses a separate machine pool, configure bgp_router=true on that machine pool before scheduling these VMs. Do not use a different VM node selector unless the same nodes also match BGPCloudConfiguration.spec.routerNodeSelector.
1. Confirm the BGP and CUDN prerequisite
The companion deployment guide creates the primary Layer 2 CUDN through BGPRouting. For this migration example, use a non-overlapping subnet that contains the source VM address, such as 10.100.0.0/16, and a workload namespace selected by the generated CUDN.
Before installing MTV, confirm the existing routing foundation:
Both BGP custom resources must report Ready, all expected sessions must report Established, and the CUDN route must be active in the AWS route tables used by migration test clients. Do not edit the Operator-generated CUDN directly.
The companion guide uses bgp-test-vms for its disposable VM. This migration guide uses a separate namespace named vms. Create it with both labels, matching the bgp-test-cudn network from the companion guide:
Both labels must be present when the namespace is created. Verify the namespace and generated CUDN before continuing:
Confirm that the generated CUDN selects cluster-udn: bgp-test-cudn, uses Layer 2 topology, contains the source address subnet, and has persistent IPAM.
2. Install the Migration Toolkit for Virtualization
Then create the controller:
Wait for the MTV pods to come up:
3. Add the vSphere provider
-
Retrieve your vCenter CA certificate. From the vCenter appliance, or by downloading
https://<vcenter>/certs/download.zip. -
Create the credentials secret:
Keep TLS verification enabled. Supply the complete CA chain for every hostname used by vCenter and the VMDK download endpoint. Without a VDDK image, MTV can download the VMDK over HTTPS by using
nbdkitandcurl. In our lab, the provider accepted the custom CA but the child curl process did not use that trust path, and guest conversion failed with:curlexit code 60 means the peer certificate could not be verified. SettinginsecureSkipVerify: 'true'allowed the lab migration to proceed, but it disabled certificate verification for the VMware provider rather than only for one disk transfer. Treat that as an experimental lab workaround, not the standard configuration. Correct the CA chain or use the supported VDDK path before production migration. Configuring a VDDK image also avoids the slow direct-download transfer described in step 5. -
Create the provider:
Consider building a VDDK image before you migrate anything. This guide does not use one, which is why the transfer in step 5 is slow and why the TLS workaround above is needed at all. The MTV 2.12 VMware migration planning documentation is firm on the point: creating the image is optional but “highly recommended”, and “using MTV without VDDK is not recommended and could result in significantly lower migration speeds.”
It is not always optional. You must use a VDDK image if the source VMs are backed by VMware vSAN.
To use one, build and push the image per the MTV documentation, then set it on the provider:
Note that storing the VDDK image in a public registry might violate VMware licence terms.
-
Confirm the provider connects and populates its inventory:
4. Record the VM address you intend to preserve
Query the MTV inventory for the source VM. The guest address comes from VMware Tools, so capture it before powering the VM off.
Record that address. It is the value you request in step 7.
5. Create the network and storage maps, and run the migration
Migrate into a namespace that does not have the CUDN label.
This is counterintuitive, but it matters. In a namespace selected by a primary CUDN, every pod receives the CUDN as its default route, including the MTV guest conversion pod. That pod needs to reach vCenter, and the CUDN has no path to your vSphere network, so conversion fails with a connection timeout after roughly two minutes.
Migrate into an ordinary namespace first, then reconstruct the destination VM in the CUDN namespace from the converted disk in step 6.
-
Create a staging namespace:
-
Create the maps. Map the source network to
pod, and the source datastore to a storage class: -
Power off the source VM in vSphere. Cold migration requires it.
-
Create the plan. Set
targetPowerState: "off"on the VM entry so the converted staging VM remains halted for inspection. SetskipGuestConversion: falseto use the standard virt-v2v conversion path. The successful Fedora migration usedpreserveStaticIPs: false. Destination CUDN address allocation is handled separately when the final VM is reconstructed in step 7. Do not substitute a different MTV preservation setting without testing it for the guest and migration path in use. -
Start the migration:
-
Watch progress:
Why did our migration take so long?
Cold migration requires transferring the VM disk from vSphere and converting the guest for OpenShift Virtualization. In our test, two steps accounted for most of the time:
ConvertGuest: Prepares the guest for OpenShift Virtualization, including changes to support VirtIO devices. This step was particularly slow in our environment, where the VMware source was accessed over a high-latency VPN connection.CopyDisksVirtV2V: Transfers the VM disk data to the destination. Its performance depends on the source storage, network connection, and transfer method.
Our 16 GiB Fedora VM was migrated over a site-to-site VPN with approximately 72 ms round-trip latency. We observed transfer rates of around 0.13 MB/s during conversion and 1.75 MB/s during disk copying, with the migration taking approximately 85 minutes overall.
This test used the nbdkit curl transport over HTTPS. We did not compare it with VDDK in this environment. For the recommended VDDK configuration, see section 3.
6. Clone the converted disk onto the CUDN namespace
The converted disk now lives in the staging namespace. Keep the staging VM halted and clone its disk into the CUDN namespace. The destination VM is reconstructed from that converted disk in the following section. Never boot two VMs with the same IP or MAC.
This example places the clone on RWX storage so the destination VM can live migrate. The RHEL 9 test used this Block-to-Filesystem CDI copy pattern.
This example uses ReadWriteMany because the destination VM will be live migrated between nodes. A VM that will remain on one node does not universally require RWX storage. On ROSA, Amazon FSx for NetApp ONTAP with the Trident CSI driver can provide RWX. See
Deploying OpenShift Virtualization on ROSA with NetApp FSx storage
for setup instructions.
Wait for the clone:
7. Request the destination IP and MAC declaratively
Persistent CUDN IPAM supports a declarative address request on the VM template. Put network.kubevirt.io/addresses under spec.template.metadata.annotations. The key inside the JSON object must match the KubeVirt interface and network name, which is default in this example.
The RHEL 9 tests confirmed declarative address assignment, automatic IPAMClaim management, stop/start persistence, and live migration. The steps below apply those results to a converted VMware disk, but that complete sequence has not yet been tested end to end. Verify the disk, guest network profile, requested identity, and first boot at each stage.
The controller creates IPAMClaim/my-vm.default, assigns the requested address, and owns its lifecycle. Do not create the claim or patch IPAMClaim.status yourself.
-
Confirm that the address and MAC are not already allocated. Check VM definitions, VMIs, and existing claims. Repeat this check immediately before starting the final VM:
-
Create the VM in a stopped state. This example requests the original VMware IP with a unique locally administered example MAC. Original VMware MAC preservation has not yet been tested through this complete procedure.
Match the firmware to the converted VM. If the vSphere VM used UEFI and the final definition falls back to legacy BIOS, the guest can stop at
SeaBIOS: Booting from Hard Disk.... Copy the firmware settings from the halted MTV-generated VM:Keep the primary network definition consistent. Use
pod: {}for the primary CUDN andl2bridgefor the matchingdefaultinterface. Adding a Multus network here would create another interface rather than selecting the primary CUDN. -
Inspect the converted guest network profile while the VM is still halted. The annotation reserves an OVN address, but it does not rewrite NetworkManager inside the disk. Check for a stale VMware interface name such as
ens33, a MAC match that no longer agrees with the VM definition, and destination gateway or DNS values that are not reachable from the CUDN.If virt-v2v already corrected the profile, keep its changes. If offline remediation is required, modify only the cloned destination disk. Do not change the VMware source guest. A DHCP profile matched to the explicit MAC is the simplest arrangement when the guest can use OVN DHCP. A guest-static profile can also work when its address, prefix, gateway, DNS, interface name, and MAC all match the destination design.
-
Start the VM. The persistent claim is created during VMI network admission:
Stop immediately if the claim does not contain
10.100.0.50/16, the VMI reports another MAC, or any other workload acquired the requested identity.
8. Verify
The migrated Fedora VM ran at 10.100.0.50, and an EC2 tester reached it through the BGP-advertised route without inbound NAT. That destination used a different MAC from the VMware source. Separately, the RHEL 9 tests confirmed the declarative annotation and explicit MAC through stop/start and live migration. The output below shows the proposed Fedora address with the locally administered example MAC from step 7.
-
The VM should come up on the original address:
-
Confirm the address from inside the guest, not just from the OVN port configuration. If
infoSourceincludesguest-agent, the guest itself is reporting it:The following output is illustrative for the proposed original-IP and locally administered MAC configuration:
An explicit MAC in the VM definition prevents OVN from generating one from the IP address. Original VMware MAC preservation remains untested and requires separate verification when licences or access controls depend on it.
-
Confirm the VM is reachable from elsewhere in the VPC, which proves the BGP advertisement is working:
-
If the VM uses RWX storage and reports
LiveMigratable=True, live migrate it and confirm the address survives:Run a continuous ping from another host in the VPC while the migration happens. Record packet loss rather than assuming there is none. In the independent RHEL test, the node changed while the declarative IP, explicit MAC, and automatically managed IPAMClaim remained unchanged. The test lost 1 packet out of 980 and the longest observed reply gap was approximately 422 ms.
This live migration result came from a native RHEL 9 test VM, not the migrated Fedora VM.
9. Evaluate outbound connectivity separately
We confirmed direct EC2-to-VM connectivity over the advertised CUDN. We attempted outbound-path checks, but did not confirm end-to-end guest-originated internet connectivity. Successful DNS resolution or inbound BGP routing does not prove that path works.
OVN logical tracing showed traffic from 10.100.0.50 leaving the CUDN gateway toward the worker br-ex interface without being translated to a worker address. The worker subnet had a default route to an AWS NAT Gateway, and both the private and NAT Gateway subnet route tables had an active BGP return route for 10.100.0.0/16. These observations support the NAT Gateway design, but do not prove the complete guest-to-internet path.
An OpenShift EgressIP is another possible design. It applies SNAT before traffic leaves the cluster. That can be useful when private destinations require a source address from the VPC CIDR, but it changes the source address those destinations observe. Firewall rules, database grants, and other controls that rely on the preserved VM IP might then need changes.
Our lab confirmed EgressIP control-plane assignment to an eligible worker and attachment of the secondary address to its AWS network interface. The VM-to-EC2 data-plane test did not produce packet evidence, so EgressIP outbound connectivity is also not presented as confirmed working.
Before selecting either approach, test both private and public destinations and capture the source address at each hop:
- From the VM, inspect the routes to a private EC2 address and to a public address.
- Capture the flow at the VM interface, worker
br-ex, and private destination. - For the NAT Gateway design, confirm that
br-exsees the CUDN source address and that a public IP echo service returns the NAT Gateway EIP. - For EgressIP, confirm which destinations observe the EgressIP and review every source-IP-based access rule.
- Reconfirm that EC2-initiated connections still reach the VM’s real CUDN address over BGP.
Keep EgressIP selectors narrow. A namespace-wide selector can affect every VM in that namespace if an eligible node is added later.
10. Plan the on-premises routing cutover
Assigning the original IP to the ROSA VM does not move ownership of the source subnet from VMware to AWS. If the same subnet still contains running VMs on premises, routers must have an unambiguous path to each address during the migration window.
Do not advertise the same aggregate from both locations and assume normal routing will select the intended VM. A phased migration can require more-specific routes for migrated addresses, carefully controlled route preference, or an L2 extension between environments. Each design has failure and rollback implications and must be tested with the network team before migration.
At minimum, define:
- when the source VM is powered off;
- when the destination route becomes authoritative;
- how on-premises clients learn the destination path;
- how return traffic stays symmetric;
- how DNS, firewalls, and load balancers are updated or verified;
- how the route is withdrawn before a source rollback.
The BGP Cloud Connector advertises the CUDN into AWS. It does not automatically provide transparent connectivity from the original on-premises network or coordinate overlapping subnet ownership.
Known limitations
-
Fedora 44 is not a supported MTV guest: We used a disposable Fedora 44 VM for this test. For production migrations, use a supported guest operating system and check the current MTV compatibility matrix.
-
Migration pods need connectivity to vSphere: MTV runs its migration pods in the target namespace. Our primary CUDN had no route to vCenter or ESXi, so we migrated the VM into a staging namespace using the default pod network, then reconstructed the destination VM in the CUDN namespace from the converted disk.
-
The original VMware MAC was not preserved: Our migrated Fedora VM used a different MAC address. We separately confirmed that an explicitly assigned MAC survives VM restarts and live migration on RHEL 9. If your applications, licences, or security policies depend on the original MAC, test this before migrating.
-
Serial console access may not work out of the box: Guests installed through a vSphere ISO may not have
console=ttyS0configured. Ifvirtctl consoleshows no output, usevirtctl vncor the VNC screenshot API to access the graphical console.
The VNC screenshot API is useful for non interactive troubleshooting, for example confirming whether a VM is actually booting:
Cleanup
Once you are satisfied the migrated VM is healthy, identify the exact staging resources owned by this migration. Delete only those resources after checking their ownership and storage reclaim policies:
Do not delete vm-staging if it contains unrelated resources. Delete the namespace only when it was created exclusively for this migration and an inventory confirms that nothing else depends on it.
Future research
The following areas still need testing:
- Guest-originated outbound connectivity: Test the AWS NAT Gateway and EgressIP designs from a normal guest session, with packet captures that show the source address before and after translation.
- Full VMware-to-CUDN declarative workflow: Test the staging clone, offline guest profile inspection, declarative address request, and first boot as one repeatable sequence on a VMware-derived disk.
- On-premises routing cutover: Test route ownership, symmetry, rollback, and phased migration when the original subnet still has active VMware workloads.
- Original VMware MAC preservation: Test the original MAC through conversion, reconstruction, restart, and live migration when an application requires it.
