
Cross-Account Edge Routing for ROSA:CloudFront to Private ALB to ROSA Secondary Ingress
This content is authored by Red Hat experts, but has not yet been tested on every supported configuration. This guide has been validated on OpenShift 4.22. Operator CRD names, API versions, and console paths may differ on other versions.
Architecture Overview
Enterprise customers frequently require multi-tenant account structures to isolate different teams. For example, the team consuming a ROSA cluster often resides in a completely separate AWS tenant from the team operating it. Establishing a clean multi-account network pattern is critical to safely exposing workloads running in ROSA without exposing developer teams to backend cluster changes.
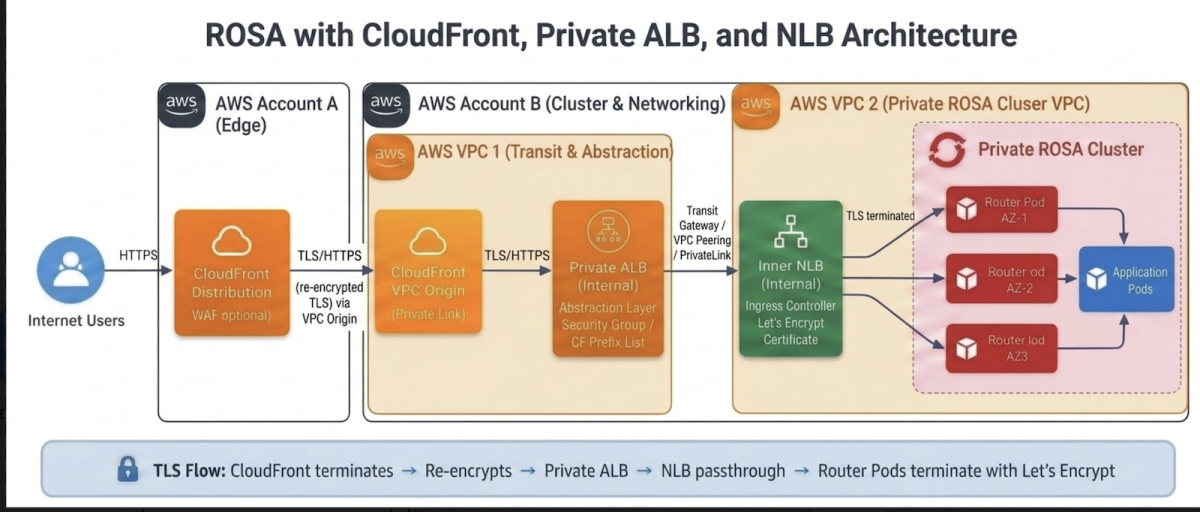
In this guide, we set up a cross-account architecture where a CloudFront distribution in Account A routes traffic through a private ALB in Account B, which then forwards requests to a ROSA cluster’s secondary Ingress Controller. This enterprise multi-tenant design pattern delivers significant benefits across security, infrastructure control, network isolation, and operational governance.
Using a Private ALB as an intermediate abstraction layer between CloudFront and ROSA is particularly valuable during major architectural transitions, such as migrating from ROSA Classic to ROSA HCP (Hosted Control Planes). This pattern establishes a unified and secure routing tier that abstracts backend cluster complexities from end users. By pairing a centralized Private ALB with cross-account edge services, organizations achieve robust security, simplified operations, and consistent traffic management across multi-cluster environments.
The ALB is what makes the multi-cluster pattern work: it performs host-based routing, so a single edge load balancer can forward different hostnames to different ROSA clusters. It also terminates TLS with its own ACM certificate, which is the certificate CloudFront validates.
High-Level Multi-cluster Architecture
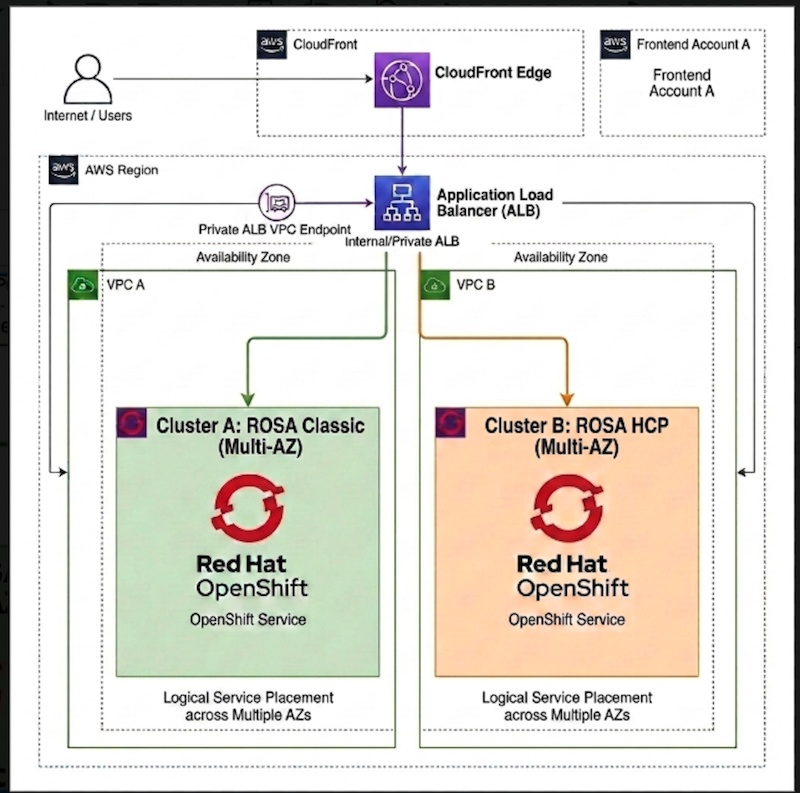
In this guide, we will set up the architecture using a single cluster. However, you can repeat these steps to point the Private ALB to additional ROSA targets, as shown above.
Section 4 configures only the listener’s default forward action, which is all a single cluster needs. Adding a second cluster is not simply a repeat of the ALB creation: give each cluster its own target group holding that cluster’s NLB addresses, then add a listener rule matching on the Host header to forward to it. The default action remains the fallback for hostnames that match no rule.
High-Level Traffic Routing Flow
1. Prerequisites
- Account A: AWS account for the CloudFront distribution
- Account B: AWS account hosting the ALB VPC, the ROSA VPC, the ALB, and the ROSA cluster
- A private multi-AZ ROSA Cluster deployed in AWS Account B. You can use these guides to deploy either a ROSA classic or ROSA HCP cluster. This guide was validated on ROSA HCP 4.22.
- ALB VPC: VPC for the private ALB. It must have an internet gateway attached, which CloudFront requires for a VPC origin even though the ALB stays internal.
- ROSA VPC: VPC where the ROSA cluster runs
- Custom Domain: A public domain you control with access to DNS management. In this guide we will be using a Route 53 domain e.g. cf.aws-amer.mobb.cloud
- AWS CLI
- oc CLI
- CIDR Requirement: The ALB VPC and the ROSA VPC must have non-overlapping CIDRs for VPC Peering to work
2. Create a private IngressController (ROSA Secondary NLB)
To connect to your private ROSA cluster, check this guide on how to configure an AWS Client VPN connection. Alternatively, you can setup a jump host to connect to the private ROSA cluster.
Set the values used throughout this guide. Do this before the first AWS CLI command, so that every command up to section 5.3 runs against Account B in one region:
Once you’re logged into your cluster, please take a look at this guide .
From there, follow the steps to create the private IngressController and its corresponding private NLB. Complete that guide through the point where:
- the IngressController is
Admitted, its router pods areRunning, and the Service has provisioned an NLB - the Service has been patched to expose the router health check port (
1936), in addition to80and443 - you have recorded the NLB target groups’ actual health, whatever it reports, as a baseline
- you have retrieved the private IP addresses of the NLB targets
Do not treat a healthy NLB target group as a prerequisite. Depending on the protocol choice below, those target groups may legitimately report 0/3 at this stage; section 4 verifies reachability directly once the PROXY setting is resolved. Record what you see so you can tell a configuration problem from the expected state.
Skip that guide’s “Create the ALB” section. This guide creates the ALB in a separate VPC in section 4.
The 1936 patch is required, not optional
The ALB target group created in section 4 health checks the router’s own health endpoint on port 1936 through the NLB. Without that patch the NLB has no 1936 listener, the health check has nowhere to land, and every ALB target stays unhealthy.
The patch is a single command in the linked guide:
Confirm the Service exposes port 1936:
You should see httphealth port=1936 alongside http and https. That is the desired state in Kubernetes; the matching AWS listener is created asynchronously and is verified once the load balancer ARN is available, in the next step.
Choose the NLB protocol deliberately
On OpenShift 4.22 a newly created IngressController defaults its NLB to PROXY. The operator then sets proxy_protocol_v2.enabled=true on every target group the Service creates, including the 1936 one added above, and sets ROUTER_USE_PROXY_PROTOCOL=true on the router.
The router’s 1936 listener does not accept a PROXY header, so with the default untouched the ALB health check in section 4 fails. There are two ways to resolve that, and neither is free. Both were measured on the cluster used to validate this guide:
protocol: PROXY + 1936 override |
protocol: TCP |
|
|---|---|---|
| ALB target group (section 4) | 3/3 healthy |
3/3 healthy |
NLB 443 target group |
0/3 |
2/3 healthy |
NLB 1936 target group |
2/3 healthy |
2/3 healthy |
| End-to-end through CloudFront | 200 |
200 |
| Hairpin, pod co-located with a router | 200 on all addresses |
times out on the co-located address |
| How it is configured | manual AWS edit, conflicts with declared state | supported API field, declarative |
2/3 is the expected figure, not 3/3: the IngressController runs two router replicas, so only the nodes holding an endpoint report healthy.
Understand what the 443 target group reading 0/3 under PROXY costs you. The ALB’s 1936 probe establishes that a router is reachable and ready through an NLB address. It does not restore per-target health filtering inside the NLB’s separate 443 target group. With every target in that group marked unhealthy, the NLB fails open and forwards to all of them, so it cannot take a genuinely failed node out of rotation. Traffic works, and the measured results below are real, but this is a tested workaround with impaired inner health filtering, not a healthy baseline. Monitoring the override addresses its drift risk; it does not address this.
Choose according to whether you need private, direct-NLB hairpin access. When that access is required, the tested PROXY workaround preserves it, but requires monitoring a manual override and accepting the impaired inner health filtering described above. When it is not required, consider the declarative TCP option after verifying your workloads’ actual DNS and traffic paths.
TCP is the declarative option and leaves every target group healthy, but it reverts to AWS native client IP preservation and reintroduces hairpin failures. Measured on the tested cluster, the two entrypoints behave differently and the distinction decides whether TCP is safe for you:
In-cluster request under protocol: TCP |
Result |
|---|---|
| To an NLB private address in the pod’s own subnet | times out |
| To the other NLB private addresses | 200 |
| To the public hostname, via CloudFront and the ALB | 200 |
The public path is unaffected because the ALB originates that connection from the edge VPC, so the NLB never sees the pod as the client. The failure is specific to a pod reaching the NLB address whose path returns to its own node.
So the decision criterion is narrower than “any callback to the ingress hostname”: choose TCP only if no in-cluster workload resolves the ingress hostname to the internal NLB address, for example through split-horizon DNS or a hard-coded private IP. Workloads that egress and come back through CloudFront are not affected. Verify against your own resolution path rather than assuming.
Do not rely on the NLBHairpinRisk alert to detect this. In the 4.22 implementation the metric is raised for an internal NLB whose effective protocol is unset; setting protocol: TCP explicitly does not satisfy that condition. The alert was silent during the reproduction above, which is expected behaviour from the implementation rather than a missed detection. It flags a configuration at risk, not failing requests.
Whichever you choose, confirm what the operator applied:
PROXY gives preserve_client_ip.enabled=false,proxy_protocol_v2.enabled=true; TCP gives the inverse.
The protocol field was added in
cluster-ingress-operator#1426
and backported to 4.22 in
#1621
. On an older release it will be absent, in which case the section 4 override is your only option:
Retrieve the NLB’s private IP addresses
These become the ALB’s targets in section 4.
Now confirm the AWS side actually has the 1936 listener, and record the baseline target health:
Expect listeners on 80, 443 and 1936. If 1936 is missing, the Service patch has not been reconciled yet; wait and re-check before continuing.
Please keep these IP addresses handy, as we are going to use them in a subsequent step when creating the target group for the ALB.
Whitespace-separated variables are wrapped in $(echo ...) on purpose
$NLB_IPS holds several addresses separated by whitespace. Bash splits a bare $NLB_IPS into separate words, but zsh does not, and zsh is the default shell on macOS. In zsh a bare for IP in $NLB_IPS passes the whole list as a single item and the command fails with errors such as CIDR block 10.0.1.10<tab>10.0.3.11/32 is malformed.
Every such use in this guide is therefore written $(echo $VAR). Command substitution is word-split by both shells. If you prefer, run the whole walkthrough under bash and the plain $VAR form is fine.
These addresses change if the Service is recreated
Deleting or recreating the router Service provisions a new NLB with new private IP addresses. If that happens, deregister the old addresses from the ALB target group in section 4 and register the new ones, or the path silently breaks.
3. VPC Peering Between Edge (ALB) VPC and ROSA VPC (Account B)
Both VPCs are in Account B, so this will be a same account VPC peering connection
3.1: Create the VPC peering connection
AWS_PROFILE, REGION and AWS_REGION were set in section 2 and still apply. Add the VPC values:
Create VPC Peering Connection
Note the PeeringConnectionId from the output, and create a variable as below
Accept the peering connection
3.2: Update Route Tables
Identify the effective route table for each participating subnet. A subnet with no explicit association uses its VPC’s main route table, so filtering on association.main=false alone can miss subnets.
Run the same loop again with $ROSA_VPC_ID substituted for $ALB_VPC_ID in both places, and record the two lists of unique route table IDs. A main route table will appear once per subnet that falls back to it; add the route to it only once.
For EACH ALB VPC route table reported by the loop, add a route to the ROSA VPC CIDR:
For EACH ROSA VPC route table reported by the loop, add a route back to the ALB VPC CIDR:
Both directions are required. A route in only one VPC produces a connection that opens and then times out.
3.3: Update ROSA_VPC Security Group
The ALB has to reach the NLB on 443 for application traffic and on 1936 for its health check. Where those rules belong depends on whether the NLB has its own security group, so determine that first rather than guessing by name.
If that returns one or more groups, the rules go on the load balancer itself, on the listener ports:
If it returns nothing, the NLB has no security group and enforcement happens on the targets. Note that for instance targets the NLB connects to the Service’s NodePort, not to 443 or 1936, so discover the real ports first:
Resolve the security groups from the registered targets themselves, not from an arbitrary instance that happens to match a tag:
The instance-discovery command above applies to instance targets. If TargetType is ip, resolve the interface holding each address instead:
Before writing any rule, read the actual value rather than assuming a default, because it decides the source address:
preserve_client_ip.enabled |
Application traffic source | Health check source |
|---|---|---|
true (what protocol: TCP sets) |
the ALB’s addresses, $ALB_VPC_CIDR |
the NLB’s own addresses |
false |
the NLB’s own addresses | the NLB’s own addresses |
With preservation enabled the two differ, so one rule does not cover both. Write them separately:
On the cluster used to validate this guide, ROSA had already opened the router NodePorts on the worker security group, so these rules were a no-op. Check before adding them.
4. Create the External Private ALB
Clear PROXY on the 1936 target group
Apply this step only if you kept the PROXY protocol in section 2. It is what makes the ALB health check pass while leaving hairpin behaviour intact. If you chose protocol: TCP, the operator has already cleared PROXY on every target group and no manual edit is needed; skip to the health probes below.
Clear PROXY on the 1936 target group alone, leaving 443 untouched so the router’s data-path expectation is unchanged:
Treat this as a manual exception, not a configuration. The Service annotation still declares proxy_protocol_v2.enabled=true for every target group, so this edit directly conflicts with declared state. The ingress operator owns the Service annotation and the AWS load balancer controller applies it across all of that load balancer’s target groups, so the edit can be reverted by any reconciliation, not only by Service recreation.
If you rely on it, monitor it. Re-check the attribute, the ALB target health, and an application request after any IngressController or Service change, and after cluster upgrades:
The AWS Load Balancer Controller does support port-specific target-group attributes, which would be a declarative alternative. That was not verified against the controller shipped with ROSA for this guide, and mixing controllers over an operator-owned Service is not advisable, so it is noted as a direction rather than a recommendation.
Confirm the health endpoint answers before creating the ALB
With the PROXY setting resolved, either by the override above or by protocol: TCP in section 2, the router’s 1936 endpoint is reachable through the NLB. Verify it from a host inside the ROSA VPC, probing each NLB address rather than just one:
Both should return 200. The router’s health and metrics server multiplexes HTTP and HTTPS on 1936, so either health-check protocol works in the target group below; this guide uses HTTPS, matching the console steps. What the endpoint does not accept is a PROXY v2 header, which is why the protocol setting matters. Let these per-address probes decide which protocol you configure, rather than assuming.
If you get a connection reset, re-check the protocol choice from section 2 and the target group attributes before continuing. Attribute changes are not applied instantly; on the tested cluster convergence took roughly two minutes. Treat that as an observed convergence time, not an acceptance criterion: poll the attribute and the endpoint until you see the expected result rather than waiting a fixed interval.
-
Navigate to the EC2 dashboard in the same account and region where your cluster exists, select Load balancers. Click on Create load balancer button. Select ALB, and click Create button
-
Configure the Load balancer name, e.g. priv-alb, select Internal as scheme, and leave the IP address type to IPv4.
-
Under Network mapping, select your ALB_VPC and all the relevant AZs and private subnets
-
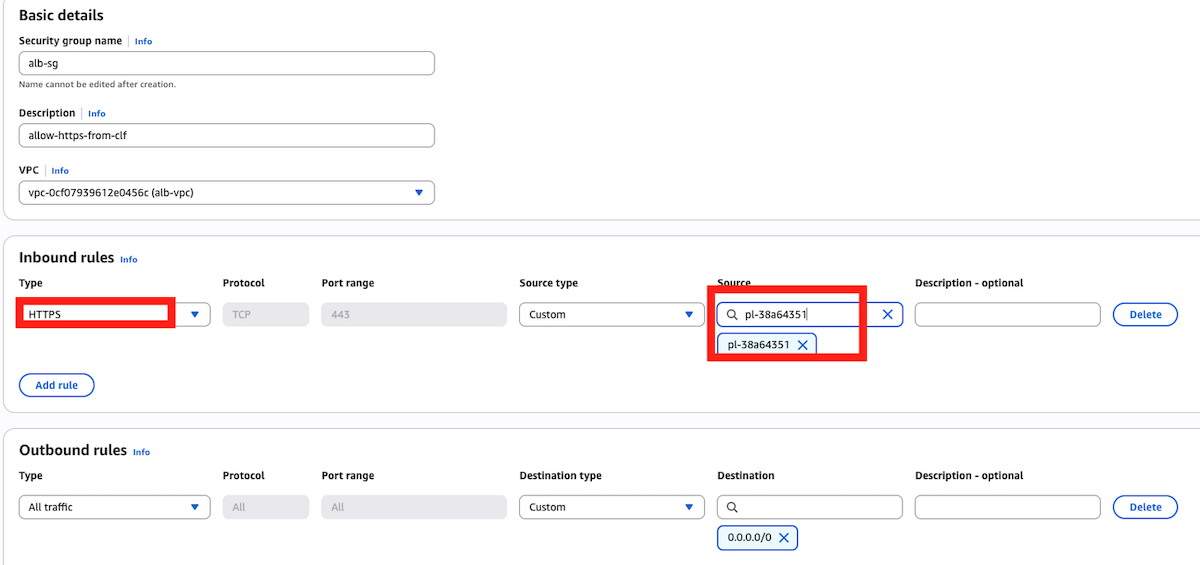
Under Security groups, click on the link create a new security group to get to a new tab. Give the security group a name, e.g. alb-sg. Add a description e.g allow-https-from-clf, and select your ALB-VPC. Under Inbound rules, click on Add rule button. Select HTTPS with port 443 for type, Custom for source and search for com.amazonaws.global.cloudfront.origin-facing, which is the CloudFront managed prefix list. Leave the Outbound rules as is, and click on the button Create security group.
-
Return to the ALB creation tab, hit the refresh button besides the Security groups box, and select the new security group you just created.
-
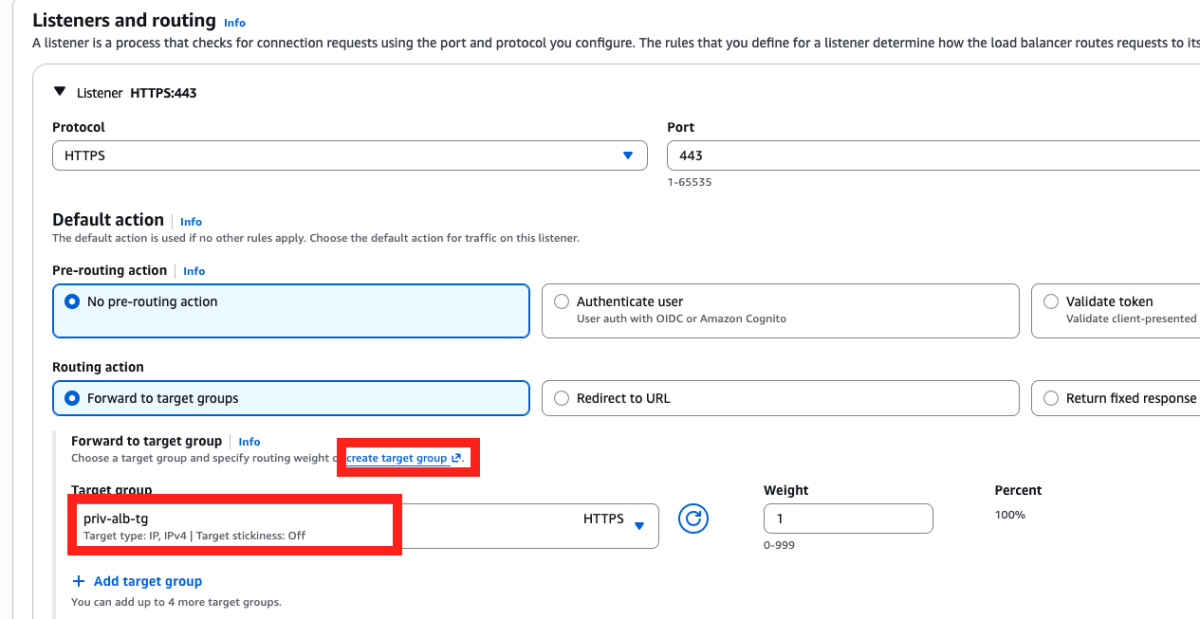
Under Listeners and routing, select HTTPS as protocol on Port 443. Next, click on create target group link under Forward to target group. This should open a new tab for you to create the target group.
-
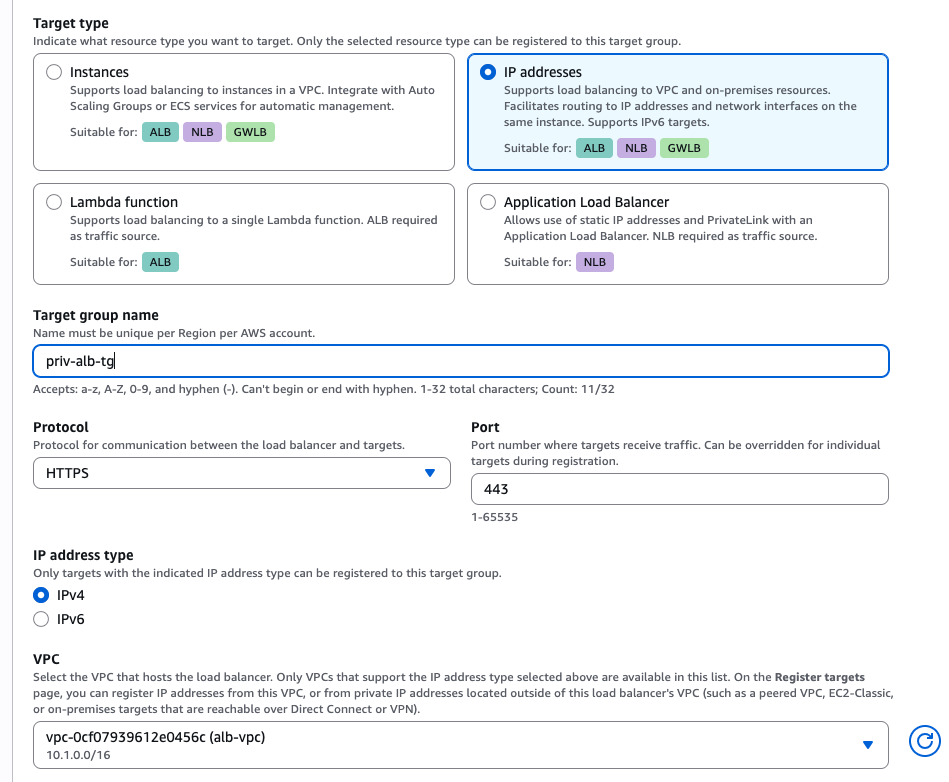
On the target group tab, select IP addresses as target type, give the target group a name, e.g. priv-alb-tg. Select protocol type HTTPS on Port 443. Leave IPv4 as IP address type, and select your ALB_VPC.
-
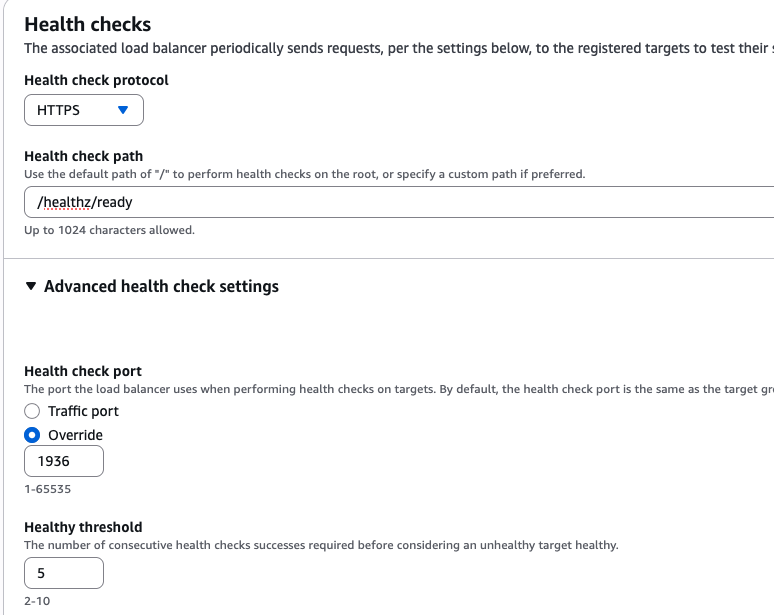
Under Health checks, choose HTTPS protocol and then type in /healthz/ready for the health check path. Expand Advanced health check settings, and under Health check port select Override and type 1936 to the port number. Leave the rest of the advanced health check settings to default. Click the Next button at the end of the page
-
Once prompted to the new site, you’ll see the network defaults to the ALB_VPC. Select Other private IP address, and select All for Availability Zone. Enter the three IP addresses of your ROSA Secondary NLB that you previously saved from above. (see snippet below). Leave the port to 443 and then click Include as pending below button.
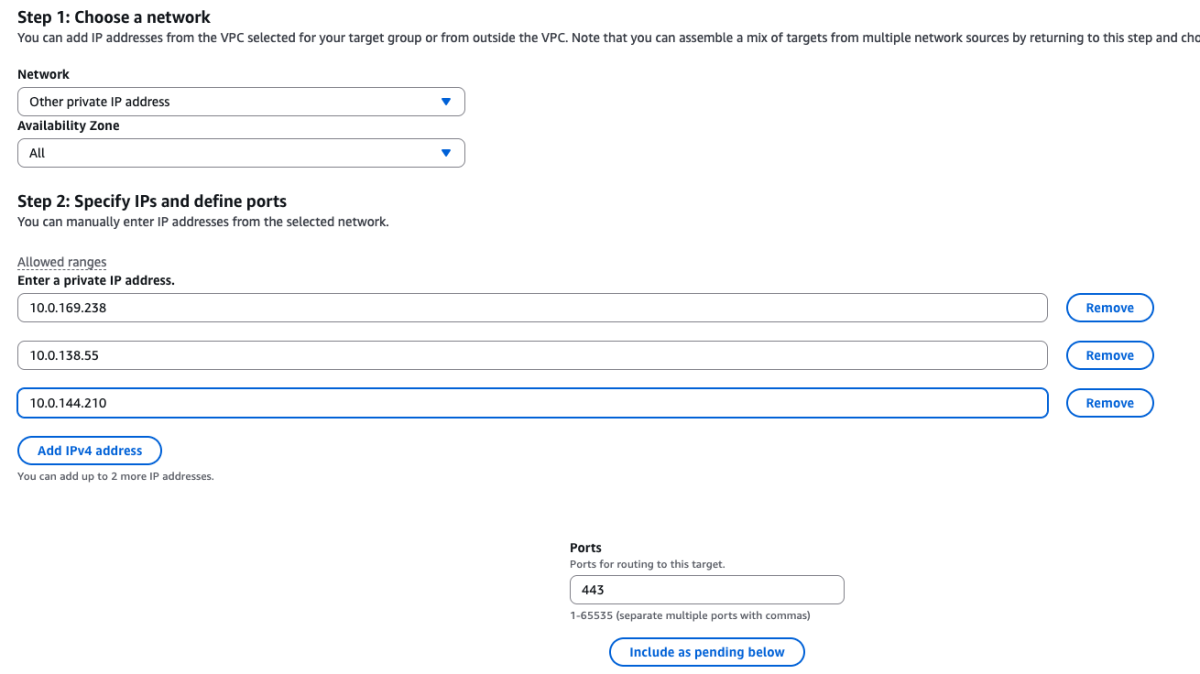
Availability Zone was set to All for this guide, with the ALB’s cross-zone load balancing left at its default (enabled). The NLB’s addresses are in the peered ROSA VPC rather than the target group’s own VPC, which is why a zone has to be chosen explicitly. AWS behaves differently when cross-zone load balancing is disabled, so if you turn it off, re-check the registration rules rather than assuming
Allstill applies. -
On the Review targets section, be sure to check that all three IP addresses are in Pending health status. Click Next to proceed. Review your entries one more time for accuracy, and click Create target group button on the lower right.
-
-
Return to the ALB creation page, refresh the target group option, and select the target group you just created
-
Under Secure listener settings, on the Default SSL/TLS server certificate section, you can choose Import certificate if you already have existing certificates. Alternatively, using From ACM as source, you can click Request new ACM certificate to create a new one, and this will lead you to a new tab. On the ACM page, click Request a certificate, choose Request a public certificate, and click Next. Insert the domain name, e.g. *.cf.aws-amer.mobb.cloud, and leave the rest to default, then click Request.
- To validate this certificate, click the Create records in Route 53 button to proceed, click Create records on the next page. Wait for a few minutes until the ACM certificate shows Issued status.
This is the certificate CloudFront validates when it connects to the origin, so it must be publicly trusted and must cover the hostname you configure as the VPC origin endpoint in section 5.
-
Next, return to the ALB creation tab, and under Certificate (from ACM) section, hit the refresh icon, and add the certificate you just created.

-
Click the Create load balancer button at the bottom to proceed. Wait until the load balancer is fully provisioned. Copy the ALB’s ARN which will be used in creating the Cloudfront VPC origin
-
Once the ALB is fully deployed, check the target group we previously created and ensure all registered targets have a Healthy status.

If they stay
unhealthywithTarget.FailedHealthChecks, re-check the1936patch from section 2, the PROXY attribute at the top of this section, the peering routes, and the security group rules from section 3.3, in that order.
CLI equivalent of this section
The console steps above were authored against the AWS console. The commands below produce the same configuration and are the form that was executed when validating this guide, so use them if you prefer the CLI or are automating.
Confirm the targets before moving on:
4.1: Routing additional clusters by hostname
A single cluster needs only the default forward action created above. Adding a second cluster is not a repeat of ALB creation: create another target group holding that cluster’s NLB addresses, then add a listener rule that matches on the Host header and forwards to it. The default action stays as the fallback for hostnames no rule matches.
Each additional cluster also needs its own route for that hostname, and the ALB listener certificate must cover it.
To confirm host matching is really driving the choice rather than the default action, a fixed-response rule is a useful one-off check:
A request to proof.$DOMAIN returns host-rule-matched, which only the host condition can produce. Delete the rule once you are satisfied.
5. Create CloudFront VPC Origin and Distribution
5.1: Create CloudFront VPC Origin
The VPC needs an internet gateway
CloudFront requires an internet gateway attached to the VPC that hosts the origin, even though the ALB stays internal and no public route to it is created. The subnets also need free IP addresses for the CloudFront-managed network interfaces. IPv6 subnet ranges are needed only for a dual-stack origin. Without an internet gateway, Create VPC origin fails with does not have an internet gateway in its VPC.
-
On the AWS console in the ALB Account, look for CloudFront, and on the CloudFront sidebar select VPC origins, and then hit the Create VPC origin. Give it a name like
alb-vpc-ogand paste the ALB’s ARN that you copied before for the Origin ARN. Choose HTTPS only for the protocol, leave the port to 443 and the minimum origin SSL protocol to TLSv1.2.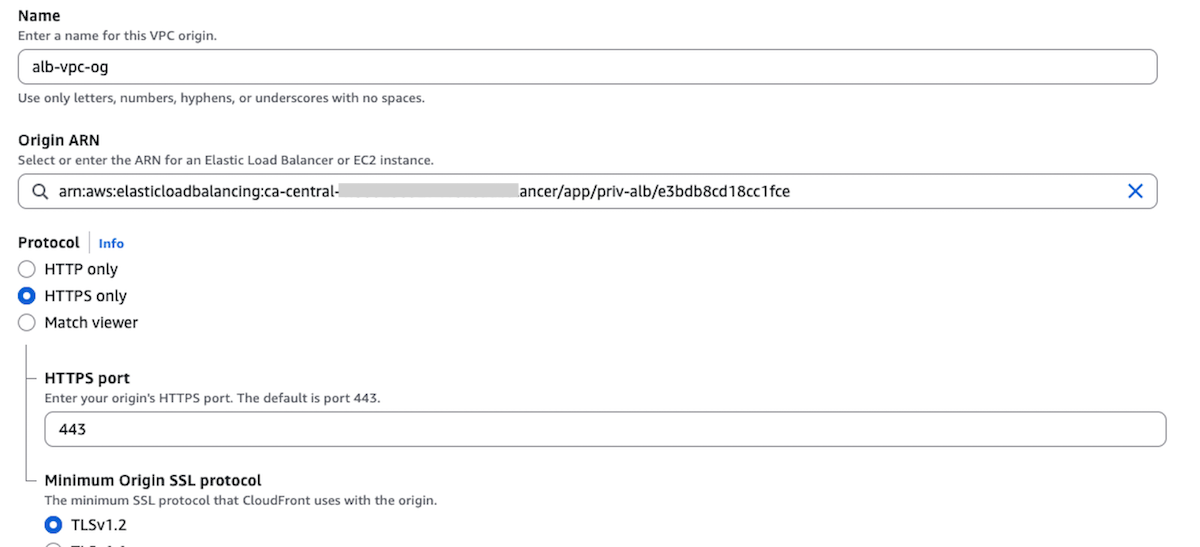
-
Click on the Create VPC origin button at the end of the page, and wait a few minutes until the VPC origin is fully deployed.
CLI equivalent of 5.1 and 5.2
Note the field is OriginSslProtocols, not OriginSSLProtocols; the latter is rejected by parameter validation.
Wait for Deployed before sharing, for the reason in the warning below:
5.2: Create VPC origin Share
-
When the VPC origin status shows Deployed, select the VPC origin and click on the Share VPC origin button.

-
On the next screen, click on the Create resource share button, which should take you to a next screen.
-
On the next screen, enter a name for the resource share e.g. alb-vpc-og-share. Specify the Principal type. In this guide, we use AWS account as the Principal type and enter the AWS account ID corresponding to the AWS account where the Cloudfront distribution will be created (AWS Account A). Click on the button Share resources to proceed. A green banner at the top of the page confirms the successful creation of the resource share.
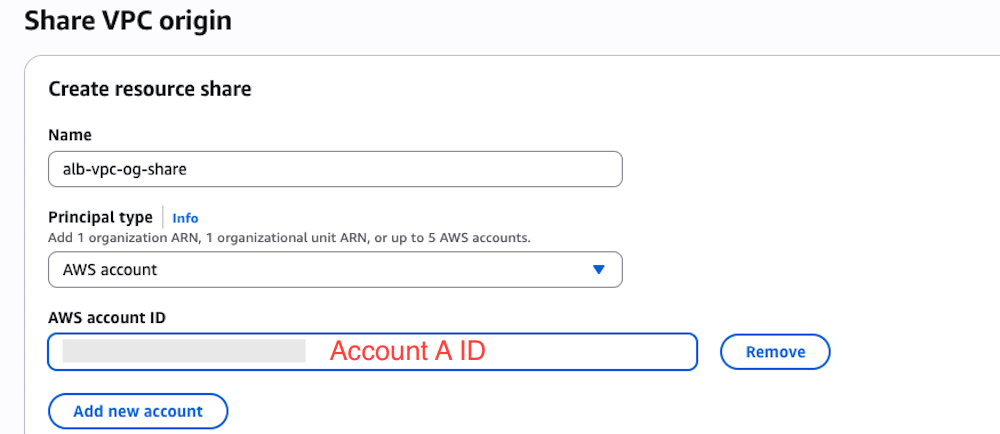
Share only after the origin reaches Deployed, then verify the association
In testing, sharing a VPC origin that was still Deploying created the resource share successfully but left the resource association in FAILED, with an empty status message and no error returned by the share command. The principal association still read ASSOCIATED, so the share looked healthy while Account A saw no origin. This is an observation from that run, not a documented AWS behaviour, but the check below costs nothing.
The console flow avoids the situation because step 5.2 begins only once the status reads Deployed. If you automate the share instead:
If the resource association reports FAILED, re-associating it once the origin is Deployed cleared it without recreating the share:
5.3: Accept the share and create the CloudFront distribution
-
Switch the CLI to Account A. Logging into the Account A console does not change which profile the CLI uses; the
AWS_PROFILEexported in section 2 still points at Account B until you change it.Everything in this section runs as Account A. Export the Account B profile again before returning to any Account B step.
-
Accept the resource share. Accounts in the same AWS Organization with sharing enabled may auto-accept, in which case no invitation appears; otherwise the share stays pending until accepted.
Confirm the origin is visible before continuing:
-
On the Cloudfront sidebar, click on VPC origins to see the origin share we previously created.

-
Click on Distributions in the sidebar, and hit the Create distribution button on the upper right corner. If this is your first time creating a distribution, you will be routed to a screen as below to choose a plan. We will be using the Pay as you go option for this guide. Click on Choose pay-as-you-go button at the end of the page to proceed.
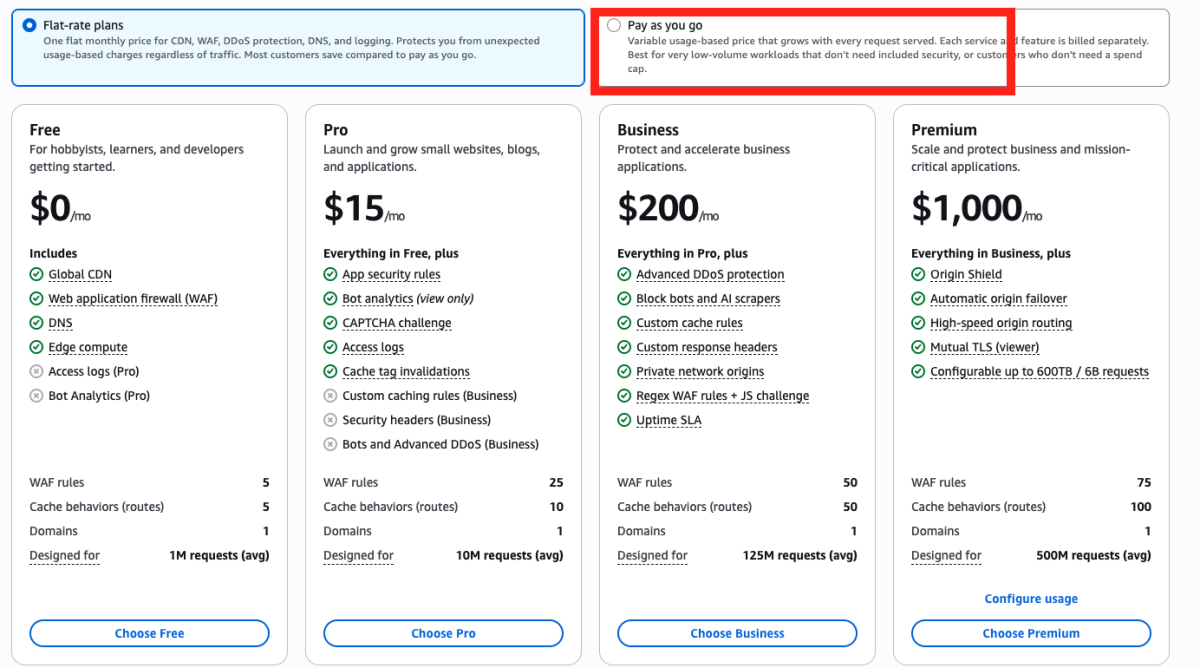
The Free and Pro plans do not support VPC origins which is the required Origin type for this routing pattern.
-
On the Distribution options section, under Distribution name, give the distribution a name like
rosa-cf-distribution. You can add a description if you want. Under Distribution type, select the type that works for your use case. We will be using theSingle website configurationoption. Skip the Domain section for now as our Route53 domain is registered in the ALB account. We will add that after the distribution is created. Click on Next. -
On the Specify origin section, under the Origin type, select VPC origin. Next, on the Origin section, under VPC origin, click on Browse VPC origins and select the VPC origin share you created e.g
alb-vpc-og-share. Under VPC origin endpoint, enter your custom domain (e.g. cf.aws-amer.mobb.cloud). Leave the origin path to blanks.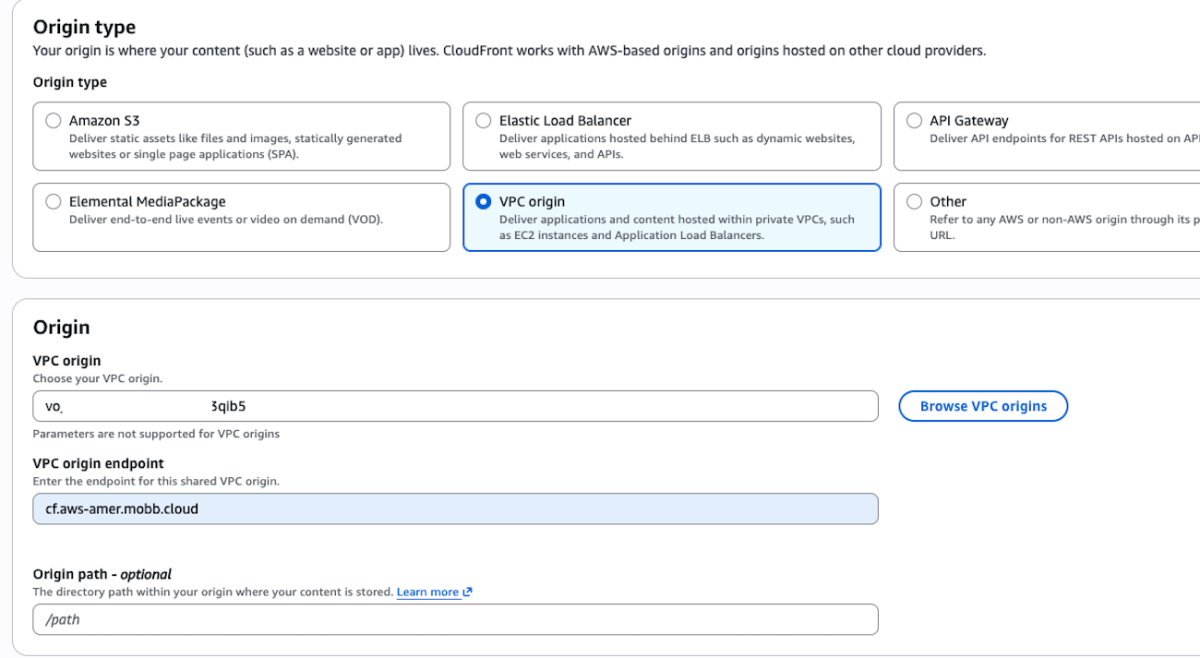
-
On the Settings section, leave the Origin settings to the default recommended setting. Under Cache settings, select customize cache settings. For the Cache policy, select CachingDisabled and choose AllViewer under Origin request policy. Leave the rest of the settings to default and click on Next at the end of the page.
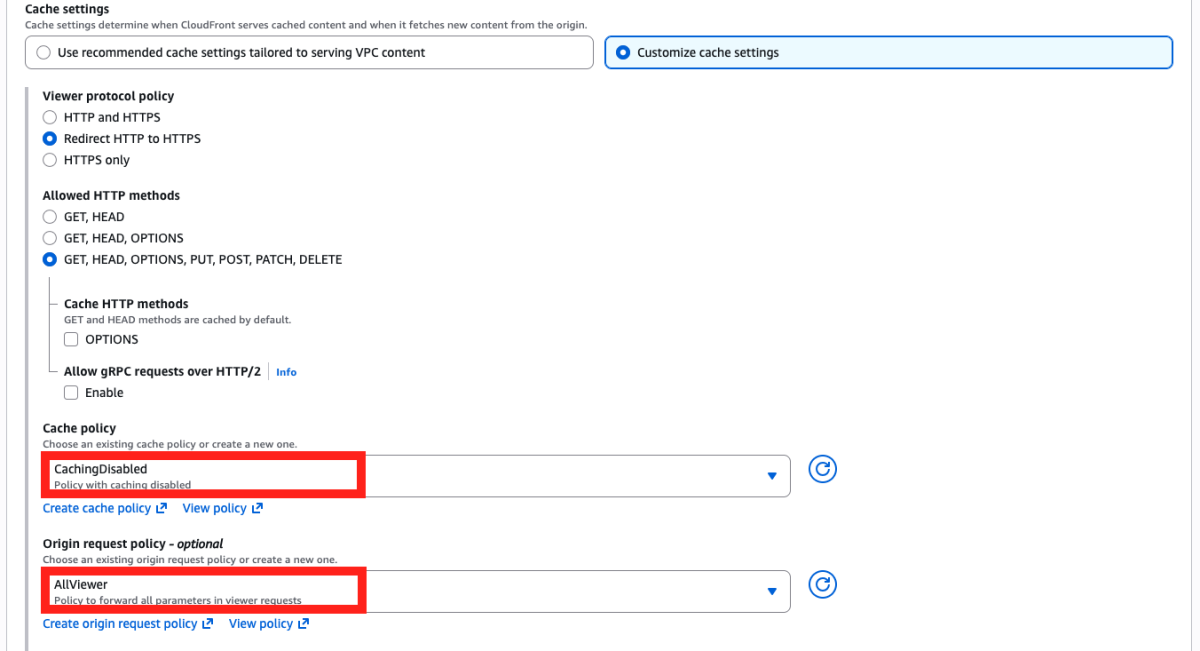
AllViewer forwards the viewer’s
Hostheader to the origin, so the router selects the route by the hostname the client requested. The meaningful acceptance test is therefore the request through your custom application hostname in section 6.3, once the alternate domain name and DNS record are in place.
Creating the distribution with the CLI
If you automate this step instead of using the console, a cross-account VPC origin requires OwnerAccountId alongside the origin ID:
Omitting it returns EntityNotFound: The specified vpc origin does not exist, even though aws cloudfront list-vpc-origins and get-vpc-origin in Account A both show the origin as Deployed.
-
On the Web Application Firewall (WAF) section, select Do not enable security protections. Note that you can always enable WAF after you create the distribution later but we are not covering it here for the sake of simplicity. Click Next.
-
On the next screen, review the details, scroll down, and choose Create distribution. You’ll be taken to a screen where you should see the distribution in the Deploying state (this takes a few minutes to complete)
-
Once the distribution is fully deployed, click on Add domain under Alternate domain names.
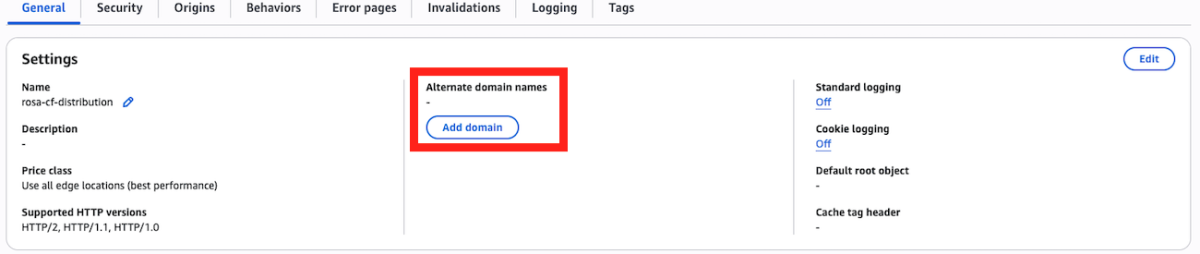
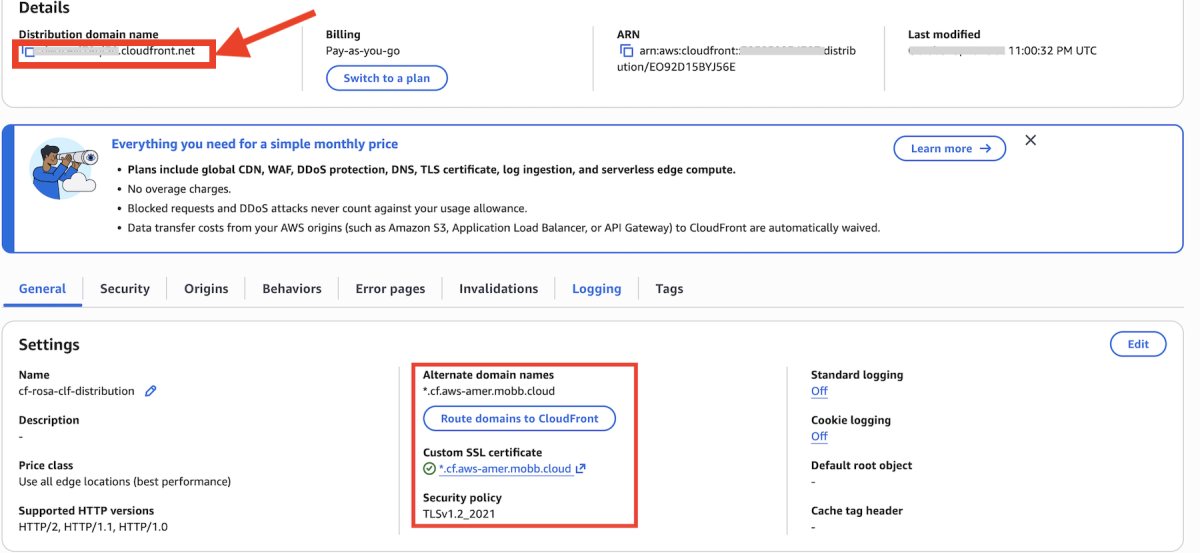
Enter you domain as a wildcard entry and click on Next. Follow the steps to create a corresponding ACM cert for the domain in the us-east-1 region. The distribution will be redeployed once the certificate is added. Wait until it fully redeploys, then copy the Distribution domain name
-
Go to your Route 53 hosted zone in Account B. Click Create record button. Create a wildcard CNAME record (e.g.
*.cf.aws-amer.mobb.cloud) and point it to the CloudFront distribution domain name you just created, and click Save.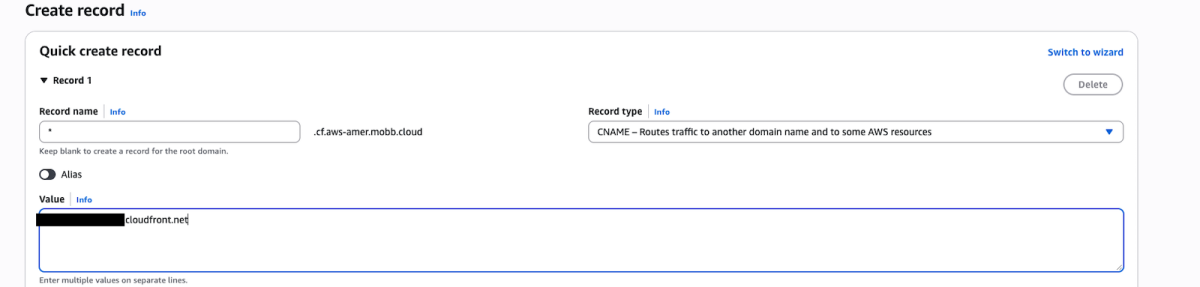
If adding the alternate domain name fails with CNAMEAlreadyExists
CloudFront refuses an alternate domain name that already resolves, through DNS, to a different distribution. A pre-existing wildcard in the parent zone is enough to trigger this even though you have not created any record for your own hostname yet:
If the zone already carries a wildcard owned by someone else, use a specific hostname rather than the wildcard, and add it in this order. The distribution already exists by this point, so no placeholder destination is needed:
- Keep the distribution as created, without the conflicting alternate domain name.
- In Route 53, create an explicit
CNAMEforhello.$DOMAINpointing at the distribution’s*.cloudfront.netdomain name. An explicit record takes precedence over the wildcard, so the hostname stops resolving to the other distribution. - Request or amend an ACM certificate in us-east-1 that covers that exact hostname.
- Add
hello.$DOMAINas the alternate domain name on the distribution and attach the certificate.
Use the same hostname here, in the certificate, and in the section 6.3 application route.
6. Validate the Architecture
6.1: Create Let’s Encrypt certificate
Sections 6.1 and 6.2 are optional
The ALB terminates TLS using the ACM certificate attached in section 4, and that is the certificate CloudFront validates. An ALB does not validate the certificate presented by its targets, so the router may keep its default self-signed certificate and the path still works.
Sections 6.1 and 6.2 optionally install a publicly trusted router certificate for direct diagnostics or for other clients that do validate. This does not change the ALB’s backend certificate-validation behaviour. The ALB still does not verify the router’s certificate either way.
If you skip these two sections, go straight to section 6.3. The commands in 6.2 depend on files generated in 6.1, so do not run 6.2 on its own. The environment used to validate this guide had the certificate installed, so the path has not been tested with the default self-signed certificate in place.
Next, let’s go back to the CLI. Skip this step if you already have a trusted certificate for your domain. To create one, you would need to run certbot so please install it if you have not already (if you’re a Mac user, you can run brew install certbot).
First, create following directories:
Then run the following as sudo to generate wildcard certificate. Change the email address to your email address.
It will then ask you to deploy a DNS TXT record under the name _acme-challenge.YOUR-DOMAIN with certain value provided by certbot. To do that, go to Route 53 and create a new record type TXT and point to that new value. Wait for a couple of minutes until it fully propagates.
Create the TXT record in the zone the public internet actually reaches
These Route 53 commands run in Account B. Section 5.3 switched the CLI to Account A, so export the Account B profile again first:
If $DOMAIN is a delegated subdomain, your account may hold several hosted zones that look plausible, and writing the record to the parent zone is silently useless: the parent has delegated that subtree, so the record is never served and Let’s Encrypt reports No TXT record found at _acme-challenge.<domain> even though the record exists in your account.
Start by asking the public internet which zone is authoritative. dig +short NS prints nothing for a name that exists without its own delegation, so use dig SOA to get the authoritative zone directly rather than inferring it from an empty answer. The case check guards against $DOMAIN being a CNAME, where the SOA returned belongs to the target’s zone and not yours:
$DNS_ZONE is $DOMAIN itself when the subdomain is delegated, and the parent zone when it is not. Either way the challenge record keeps the name _acme-challenge.$DOMAIN; only the hosted zone you write it into changes.
Now find the hosted zone for $DNS_ZONE, not for $DOMAIN:
Confirm the delegation set matches what the internet returns for that zone:
Those nameservers must appear in the delegation set above. If they do not, the hosted zone you found is not the one the internet resolves, and the record belongs elsewhere.
Read the answer carefully if the zone contains a wildcard. With no TXT record present, a wildcard such as *.$DOMAIN answers the query instead, so dig TXT returns something that looks like a result but is a CNAME from the wildcard. Only a quoted TXT value matching what certbot printed means the record is live.
Check the aa flag when querying a nameserver directly
Querying a nameserver with dig @<nameserver> does not guarantee your query reached that server. While validating this guide, direct queries to all four of the zone’s nameservers returned a superseded wildcard answer while ordinary resolution returned the correct new record. The replies carried no aa flag and a TTL that decreased between queries, which is consistent with an intermediate resolver answering from cache, as happens on some corporate and VPN networks.
Look at the flags. An authoritative reply carries aa:
If aa is absent, this reply is not marked authoritative. That alone does not prove caching or interception. Check the response status and which server actually answered, and compare against an independent resolution path, such as dig @1.1.1.1 or a host on a different network, before attributing the result to either cause or concluding the record is wrong.
Open a new CLI tab and run either:
Or:
And see if the value matches. If it matches, then go back to the tab where you run certbot command, and hit Enter.
Once the certificate (fullchain.pem) and the key (privkey.pem) were successfully created, set the following permissions:
Then copy them for next step:
6.2. Configure the secondary IngressController certificate
Next, we are going to configure the certificate we created just now to the private secondary ingress controller. To do that, let’s first create a TLS secret:
Then, configure the secondary IngressController’s default certificate:
Wait for a few minutes until the router pods restart:
6.3: Test an application
Finally, let’s test this setup by creating a public application.
-
Create a new project
-
Create a new application
-
Create a route for the application
-
Check that you can access the application:
You should see the output Hello OpenShift!. Alternatively, go to your browser and access it from there.
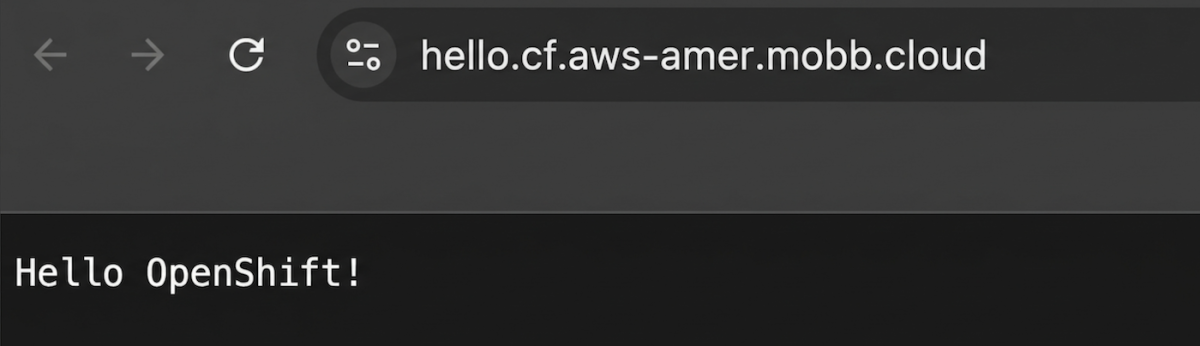
The route hostname, the distribution’s alternate domain name, and the DNS record must all be the same name. If they differ, the request reaches the router with a hostname it has no route for and you get a 503 from the router rather than the application.
