Integrating Service Mesh into a ROSA Cluster
This content is authored by Red Hat experts, but has not yet been tested on every supported configuration. This guide has been validated on OpenShift 4.20. Operator CRD names, API versions, and console paths may differ on other versions.
This is a simple guide to integrate Red Hat OpenShift Service Mesh into your ROSA cluster. In this scenario, we will install Service Mesh using a custom domain (optional) and expose an app to test it. The first half of the guide will be integrating Service Mesh 2.x and second half will be integrating Service Mesh 3.x .
Prerequisites
- A classic or HCP ROSA cluster v4.14 and above.
- The oc CLI # logged in.
- A Domain Name in a public zone. These instructions assume Route 53, but can be adapted for any other DNS.
- An app to expose (alternatively, we will be creating a simple Hello OpenShift app in this guide)
Set up environment
Install the necessary operators, i.e. Elasticsearch (optional), Jaeger (distributed tracing platform), Kiali, and Service Mesh (2 or 3 depends on your use case) from OpenShift console.
Then log into your cluster via CLI and set up the following environment variables.
Service Mesh 2.x
Step 1 - Create the Service Mesh Control Plane
Let’s first create a new project where the control plane resides.
And then the control plane. Note that here we are using Service Mesh 2.6.
Step 2 - Create the Service Mesh Member Roll
Here we will create Service Mesh Member Roll to define which namespaces are part of the mesh and will have Istio functionality applied to them.
Step 3 - Configure namespace for mesh injection
Next, we will inject mesh which is essentially a process of annotating a namespace to automatically inject the Istio sidecar proxy into all pods created in that namespace.
Step 4 - Deploy Hello OpenShift app (optional)
Skip this step if you have already created an app.
Step 5 - Add sidecar injection to deployment
Sidecar injection is in essence the deployment of an Envoy proxy container alongside your application container to intercept and manage all network traffic.
Then restart deployment to trigger sidecar injection:
And verify pods have sidecars (should show 2/2 ready):
Step 6 - Create Istio Gateway
Istio Gateway is a load balancer operating at the edge of the mesh that manages inbound and outbound HTTP/TCP connections.
Step 7 - Create Virtual Service
Virtual Service is a traffic routing rule that defines how requests sent to a service are routed within the mesh, enabling fine-grained traffic control.
Note that if you are using multiple domains, then you might want to wildcard the hosts, i.e. *.com, to preserve the domain all the way to the application.
Step 8 - Create OpenShift Route to Istio Ingress Gateway
In the context of Service Mesh, OpenShift Route is a way to expose the Istio Ingress Gateway to external traffic using OpenShift’s built-in routing layer.
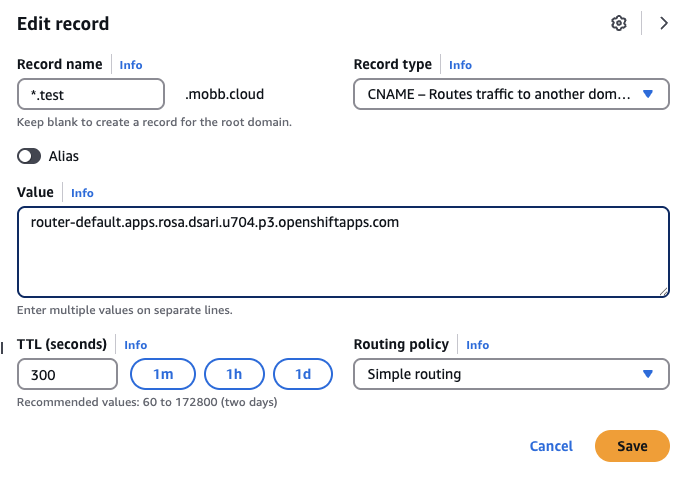
Step 9 - Configure custom domain (optional)
If you’re using custom domain, then go to AWS Console and change the record to point to the route hostname.
Get your canonical route hostname:
This should give you an output like router-default.apps.rosa.your-cluster-name.xxxx.px.openshiftapps.com. Use this as the value of your domain.
Step 10 - Verify the setup and access the application
Check if ingress gateway is running:
Access your application by testing the route:
You should see the output Hello OpenShift!.
Note: If you are accessing your browser, you might get Not Secure warning due to certificate mismatch. Since this is a testing environment, you can safely ignore this. However, for production environment, you might want to use a custom certificate for your route, or use Let’s Encrypt with OpenShift’s cert-manager, for example.
Service Mesh 3.x
In this section, we will validate Red Hat OpenShift Service Mesh 3 using sidecar mode and the Kubernetes Gateway API.
Unlike Service Mesh 2.x, Service Mesh 3 uses the sailoperator.io/v1 API and manages the control plane with an Istio resource. For sidecar-based workloads, you also need to create an IstioCNI resource before injected application pods will work correctly.
Step 1 - Create the Service Mesh control plane namespace
Create the namespace where the Service Mesh control plane will run.
Step 2 - Create the Service Mesh 3 control plane
Create a minimal Istio resource for the control plane.
Wait for the control plane to be ready:
You should see the Istio resource become Healthy and the istiod pod running.
Step 3 - Create the Istio CNI resource
For sidecar injection in Service Mesh 3, create an IstioCNI resource.
Wait for the CNI pods to be ready:
After this completes, verify the Istio resource is still Healthy:
Step 4 - Create an application namespace and enable sidecar injection
Set the application namespace and enable sidecar injection using the namespace label.
Create the namespace:
Enable sidecar injection:
Verify the label:
Step 5 - Deploy Hello OpenShift app
Deploy a simple test application that listens on port 8080.
Wait for the deployment:
Confirm that the workload received the injected sidecar by describing the pod:
You should see the injected istio-proxy container in the pod details.
Step 6 - Create a Kubernetes Gateway API Gateway
In Service Mesh 3 sidecar mode, we can expose the application using the Kubernetes Gateway API.
Step 7 - Create an HTTPRoute
Create an HTTPRoute that routes incoming traffic from the Gateway to the hello-openshift service.
Verify the gateway resources:
You should see a generated gateway deployment and LoadBalancer service, typically named something like hello-gateway-istio.
Step 8 - Test external access
Get the external address from the generated gateway service:
Test the application by sending the expected Host header:
You should see:
Step 9 - Configure a custom domain (optional)
If you want to use your own DNS name instead of a curl Host header, create a DNS record that points to the external hostname of the generated gateway service.
For example, point your chosen hostname to the ELB hostname shown by:
Then update the hostname in the Gateway and hostnames in the HTTPRoute to match your chosen DNS name.
Step 10 - Clean up (optional)
Delete the application namespace and Service Mesh resources when you are done testing: