
Azure Front Door with ARO (Azure Red Hat OpenShift)
This content is authored by Red Hat experts, but has not yet been tested on every supported configuration. This guide has been validated on OpenShift 4.20. Operator CRD names, API versions, and console paths may differ on other versions.
Securely expose an Internet facing application on a private ARO Cluster using Azure Front Door.
When you create a cluster on ARO you have several options in making the cluster public or private. With a public cluster you are allowing Internet traffic to the api and *.apps endpoints. With a private cluster you can make either or both the api and .apps endpoints private.
How can you allow Internet access to an application running on your private cluster where the .apps endpoint is private? This document will guide you through using Azure Front Door to expose your applications to the Internet. There are several advantages of this approach, namely your cluster and all the resources in your Azure account can remain private, providing you an extra layer of security. Azure Front Door operates at the edge so we are controlling traffic before it even gets into your Azure account. On top of that, Azure Front Door also offers WAF and DDoS protection, certificate management and SSL offloading just to name a few benefits.
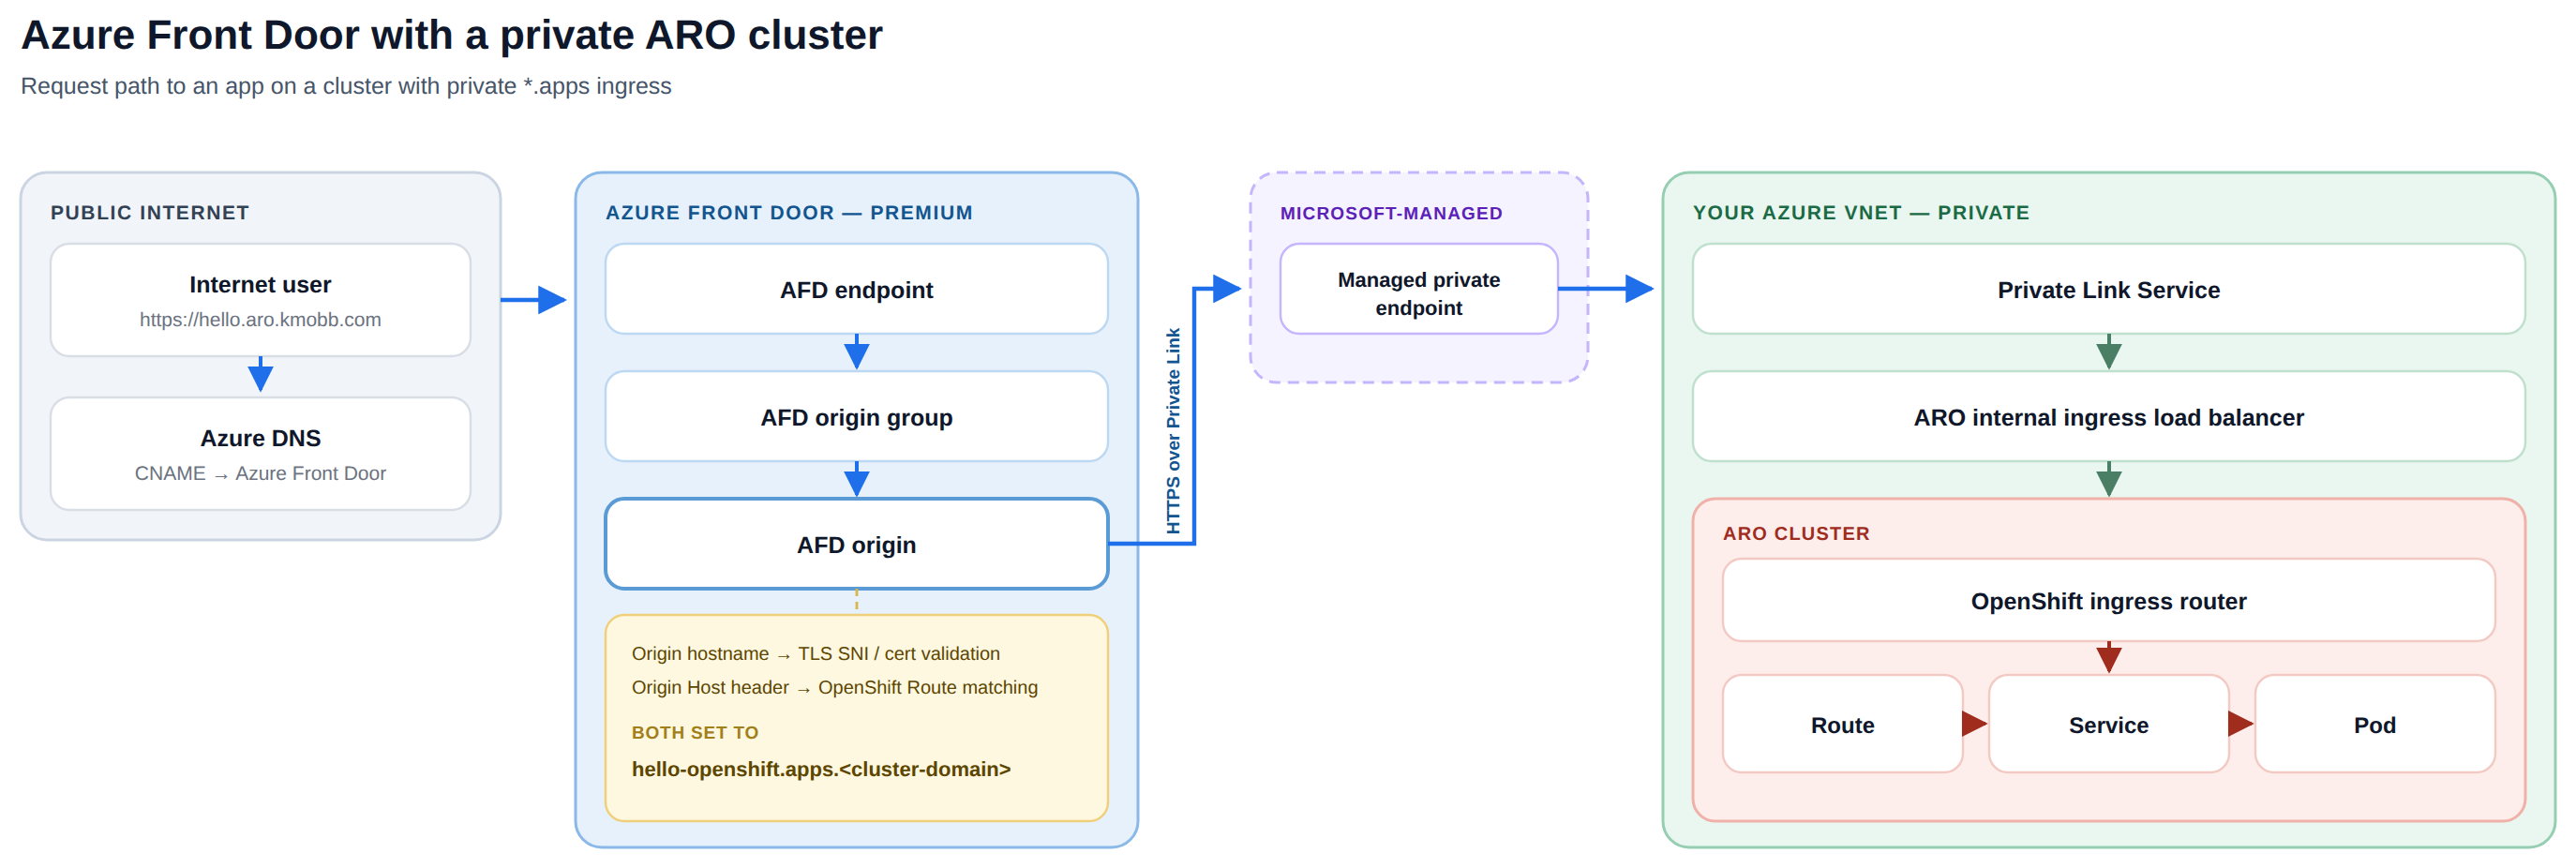
This guide keeps Azure Front Door’s origin hostname and origin host header aligned with the OpenShift Route hostname under the cluster apps domain. On the HTTPS connection from Front Door to the private ARO ingress, the origin hostname is used for TLS SNI and certificate name verification against the OpenShift router’s wildcard certificate. Front Door also sends the same hostname in the HTTP Host header, which allows the OpenShift router to select the matching Route.
Architecture Diagram
The following diagram shows the end-to-end request path from a public client through Azure Front Door Premium and Private Link to the private ARO ingress. It also highlights how the OpenShift apps hostname is used for both TLS SNI and the HTTP Host header, while serving different purposes for certificate validation and Route matching.
Prerequisites
- az cli
- oc cli
- jq cli
- a custom domain
- a DNS zone that you can easily modify
The available Azure Front Door Private Link arguments can vary depending on the Azure CLI and cdn extension version. This guide includes commands for both supported argument formats.
Make sure to use the same terminal session while going through this guide for all commands as we will reference environment variables set or created throughout the guide.
Get Started
-
Create a private ARO cluster.
Follow this guide to Create a private ARO cluster or simply run this bash script
Set Environment Variables
-
Manually set environment variables
DOMAINis the domain you will be adding to Azure DNS to manage.ARO_APP_FQDNis the FQDN you want for your application, e.g.hello.aro.kmobb.com.AFD_CUSTOM_DOMAIN_NAMEis your FQDN with dots replaced by dashes, e.g.hello-aro-kmobb-com.DNS_ZONE_RGis the resource group for your Azure DNS zone. This may be the ARO resource group if you create a new zone for this guide, or a shared DNS resource group if the zone already exists. -
Set environment variables with Bash
Choose a
PLS_SUBNET_PREFIXthat is inside your ARO virtual network address space and does not overlap with existing ARO, jumphost, or other subnets.
Create a Private Link Service
After we have the cluster up and running, we need to create a private link service. The private link service will provide private and secure connectivity between the Front Door Service and our cluster.
-
Create a dedicated subnet for the Private Link Service
-
Create the Private Link Service targeting the ARO internal ingress load balancer
Create and Configure an instance of Azure Front Door
-
Create a Front Door Instance
-
Create an endpoint for the ARO Internal Load Balancer
-
Create a Front Door Origin Group that will point to the ARO Internal Loadbalancer
-
Create a Front Door Origin with the above Origin Group that will point to the ARO Internal Loadbalancer
Both
--host-nameand--origin-host-headermust use the cluster’s apps wildcard domain (e.g.hello-openshift.apps.<cluster-domain>). Azure Front Door requires certificate name verification (enforceCertificateNameCheck) for private link origins, and the OpenShift router’s wildcard certificate only covers*.apps.<cluster-domain>, not your custom domain or the load balancer’s IP address. Using the apps domain ensures the certificate check passes and that the HTTP Host header matches the OpenShift Route.Newer Azure CLI/cdn extension versions use
--shared-private-link-resourceinstead of the older private link flags. The JSON shape below matches the current resource model accepted by the CLI. -
Approve the private link connection
-
Add your custom domain to Azure Front Door
-
Create an Azure Front Door endpoint for your custom domain
-
Add an Azure Front Door route for your custom domain
The
--forwarding-protocol HttpsOnlysetting ensures Front Door connects to the origin over HTTPS, allowing Front Door to send the Route hostname as TLS SNI and validate the OpenShift router wildcard certificate. The corresponding HTTP Host header is used for OpenShift Route matching. -
Update DNS
Get a validation token from Front Door so Front Door can validate your domain
-
Create a DNS Zone
If you already have an Azure DNS zone, skip zone creation and set:
You will need to configure your nameservers to point to Azure. The output of running this zone create will show you the nameservers for this record that you will need to set up within your domain registrar.
Create a new text record in your DNS server
-
Check if the domain has been validated:
Domain validation can take several hours. Your FQDN will not resolve correctly through Front Door until the custom domain is validated and the route is active at the edge.
Also check whether the custom domain is active on the route:
Front Door custom domain validation and route deployment are separate operations. The custom domain can show
Approvedbefore the route is active at the edge. If the application still returns an Azure Front Door404 CONFIG_NOCACHE, wait for route deployment and edge propagation, then retry before changing the origin configuration. -
Add a CNAME record to DNS
Get the Azure Front Door endpoint:
Create a CNAME record for the application
Deploy an Application
Now let’s deploy a simple application to verify the Front Door configuration.
-
Log into your OpenShift cluster
Before deploying the application, run
ocfrom a host that can reach both the private API endpoint and the private OAuth/apps routes. This can be a VPN-connected workstation, a jumphost, or a local SSH tunnel that forwards the required private hostnames. Avoid assuming that the newestocclient will run on older jumphost images; use a compatible client for that host.A great way to establish this connectivity is with a VPN connection. Follow this guide to setup a VPN connection with your Azure account.
-
Create a new OpenShift project and deploy the hello-openshift application
-
Create a TLS edge-terminated route using the apps wildcard domain
The Route uses a hostname under the cluster apps domain. Front Door uses the same hostname as its origin hostname for TLS SNI and certificate validation, and as its origin host header for OpenShift Route matching.
-
Check the DNS settings of your application
Notice that the application URL is routed through Azure Front Door at the edge. The only way this application running on your cluster can be accessed is through Azure Front Door which is connected to your cluster through a private endpoint.
Sample output:
Test the Application
Point your browser to your custom domain (e.g. https://hello.aro.kmobb.com). You should see “Hello OpenShift!”.
Verify the Origin Hostname Is Required
To prove that Front Door must send a hostname that matches the OpenShift route and router certificate, temporarily change the origin hostname and origin host header to a non-matching apps-domain hostname. Without a matching hostname, the OpenShift router cannot route the request.
-
Set the origin to a non-matching hostname
-
Test the application (it should fail)
After propagation, the request should fail, commonly with
503from Front Door or404from the OpenShift router. The exact transition can take several minutes. -
Restore the origin settings
Wait for the restored origin settings to propagate before retesting. During propagation, responses can temporarily remain
503or404. -
Test again (it should work)
You should receive a
200, confirming that the origin hostname and Host header must remain aligned with the OpenShift Route hostname for TLS validation and Route matching.
How SNI Works in This Configuration
The SNI flow through Azure Front Door to your private ARO cluster works as follows:
- Client → Front Door: The client connects to Azure Front Door using your custom domain (e.g.
hello.aro.kmobb.com). Front Door terminates TLS and presents its managed certificate for your custom domain. - Front Door → Origin (Private Link): Front Door uses the configured origin hostname as TLS SNI when establishing the HTTPS connection to the origin. Because that hostname is under the cluster apps domain, it matches the OpenShift router wildcard certificate. Front Door separately sends the same hostname as the HTTP Host header through
--origin-host-header, allowing the router to select the matching Route. - OpenShift Router: The OpenShift router receives the HTTPS connection for a hostname covered by its wildcard apps certificate. After TLS termination, the router uses the route hostname/Host header to forward the request to the matching hello-openshift route.
- Router → Pod: The router terminates TLS (edge termination) and forwards the request as HTTP to the hello-openshift pod.
The custom domain (hello.aro.kmobb.com) is only used between the client and Front Door. Between Front Door and the origin, the apps wildcard domain is used so the OpenShift router’s TLS certificate is valid for the connection.
Clean Up
Delete the Front Door profile before deleting the Private Link Service or cluster. Front Door creates a private endpoint connection against the Private Link Service, and that connection can block PLS deletion until Front Door is removed or the private endpoint connection is explicitly deleted.
If all resources were created in one resource group for a disposable test, delete that resource group:
If you created the ARO cluster with Terraform, prefer Terraform cleanup so state stays consistent:
If you used an existing/shared DNS zone, remove the DNS records separately:
